 Domain NamesFind and register your ideal domain name instantly.
 Web HostingEasy-to-use hosting powered by cPanel — ideal for managing websites in Nigeria.
 Windows HostingRun .NET apps with Windows-optimized hosting
 Affiliate ProgramMake money promoting our services
 Reseller HostingMake money by reselling our hosting products under your own brand
 .COM Domains
 All DomainsExplore all supported tld domains in Nigeria
 WhoisFind out who owns any domain, as well as verify your registration details
 VPS Hosting in Nigeria
 Dedicated ServersReimagine your site speed with your own complete server
 AI Website BuilderDesign your site with drag-and-drop tools
 Online Store BuilderStart your online shop without code
 SSLs
SSLs Support PortalFind answers or get expert help
 Contact UsReach our team via chat or email
 BlogRead our extensive guides on web hosting and more
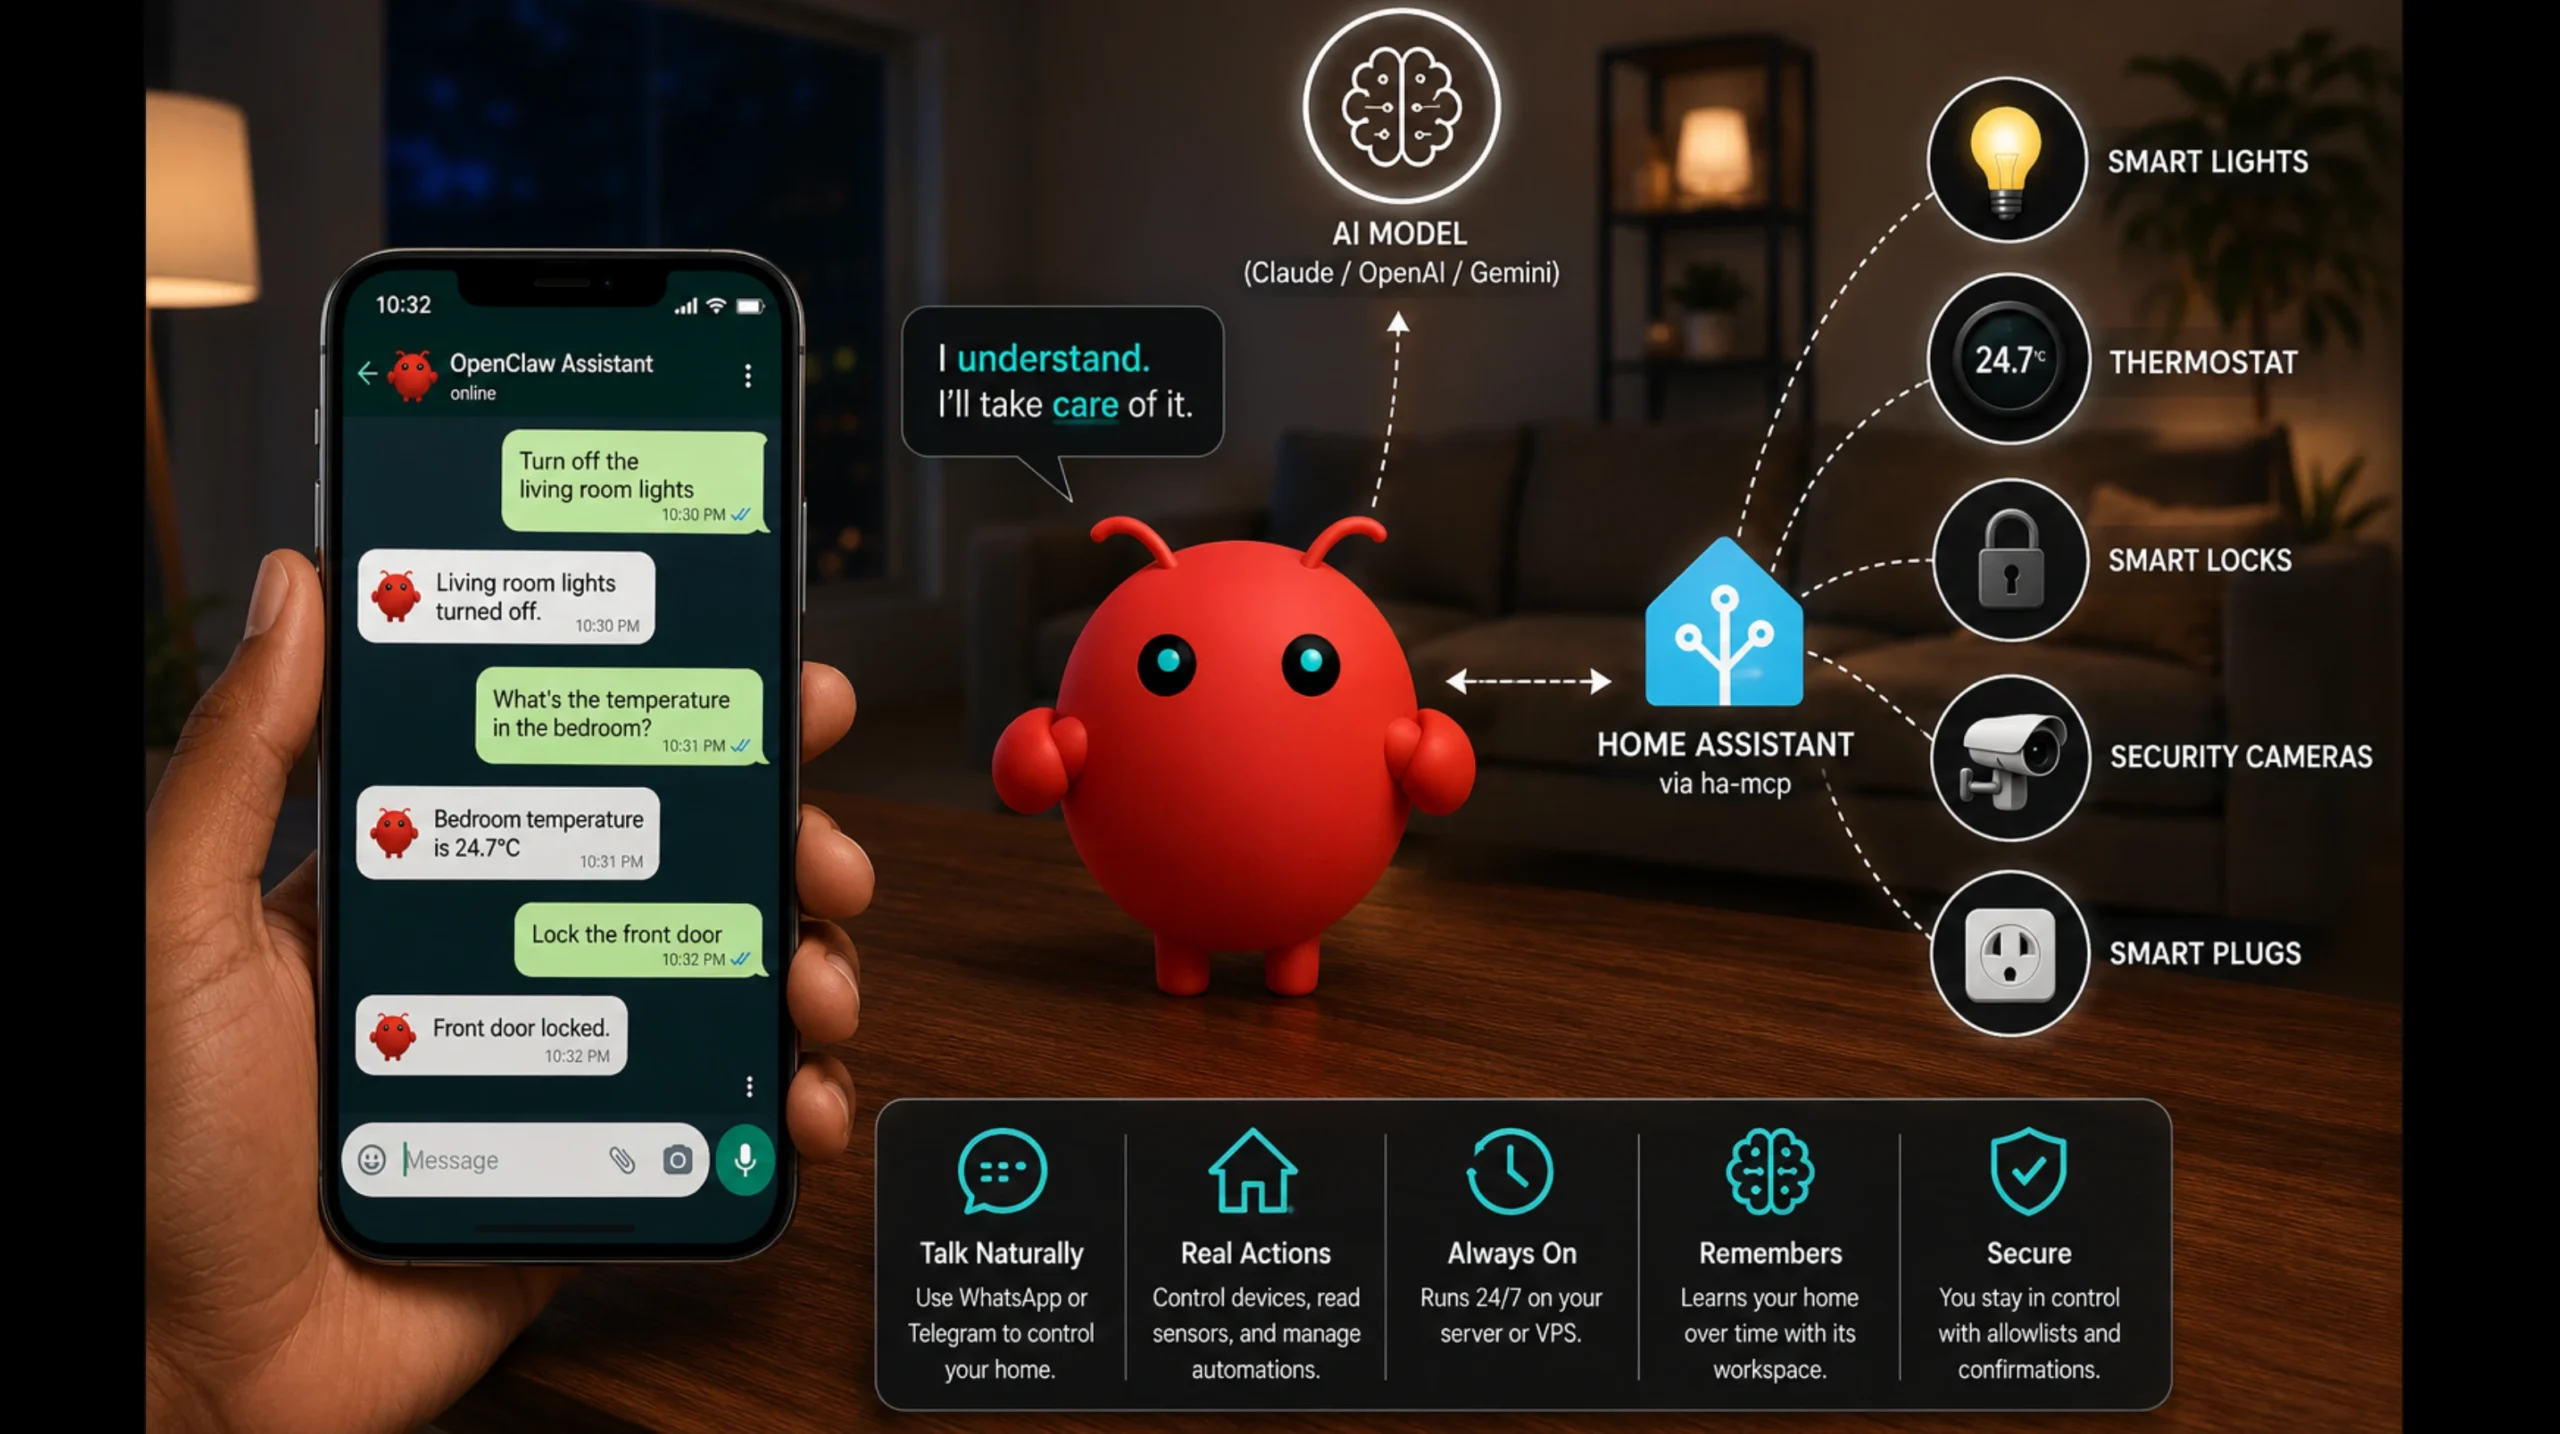
You want an AI assistant that lives on your phone, knows your home, takes action when you ask it to, and doesn’t disappear when you close an app. Well, that’s OpenClaw.
Most “smart home” setups still make you open an app, tap through menus, and manually toggle things. But what if you could control your home from your WhatsApp?
You simply message a number, and things happen.
OpenClaw is a self-hosted AI gateway that connects a messaging channel to an AI model designed to do things and not just answer questions. It remembers context between sessions, runs scheduled tasks, and can be given a persona.
Through ha-mcp, OpenClaw connects to your Home Assistant installation to control devices, create automations, and read sensor data. This guide walks you through the full setup, from installation to your first working command.
But before we begin, confirm you have the following:
- Home Assistant already running on a Raspberry Pi, a local machine, or a VPS
- A server or VPS to host OpenClaw
- An AI model API key from Anthropic (Claude), OpenAI, or Google
- A second SIM or phone number for the assistant’s WhatsApp. Do not link your personal WhatsApp; every message someone sends you becomes agent input.
- Node.js 22.22.3 or higher if you’re installing manually (Node 24 is recommended as of mid-2026)
One thing worth spelling out, though, is that OpenClaw’s Gateway needs to be reachable 24/7. If it goes offline, your assistant goes silent. A laptop doesn’t cut it. A home Pi on an unstable connection is risky. So, a VPS is the right call.
If you need a ready-to-go environment billed in Naira, our OpenClaw VPS plans deploy in seconds.
How to Set Up OpenClaw as Your Home Assistant
With everything ready, it’s time to connect the pieces together. The setup is simple, especially since the onboarding wizard handles most of the configuration for you.
Step 1: Install OpenClaw and Run the Onboarding Wizard
If you’re installing OpenClaw yourself, the installation only takes a few minutes.
On Linux and macOS, run the official installation command:
curl -fsSL https://openclaw.ai/install.sh | bashOn Windows, open PowerShell and run:
iwr -useb https://openclaw.ai/install.ps1 | iexOnce installation completes, run the onboarding wizard:
openclaw onboard --install-daemonThe onboarding wizard guides you through the initial configuration, including:
- Selecting your preferred AI model provider.
- Entering your API key.
- Configuring the OpenClaw Gateway.
- Creating the default workspace.
- Preparing the services OpenClaw needs to run.
By the time the wizard finishes, your installation is ready for the next stage.
If you’re using one of our Truehost OpenClaw VPS plans, OpenClaw is already installed before the server is delivered. You can skip this installation step and continue with the remaining configuration.
Step 2: Verify the Gateway
The Gateway keeps your messaging channels connected and passes requests between your AI model and the tools it can access.
Before moving on, confirm that it’s running correctly.
Execute:
openclaw gateway statusA healthy installation should show that the Gateway is running and listening on port 18789, which is OpenClaw’s default Gateway port.
If the Gateway isn’t running, or you receive a message indicating that the port is already in use, another application may already be using the port. Stop the conflicting service or configure OpenClaw to use a different available port before trying again.
Resolving Gateway issues now saves time later when connecting messaging channels and Home Assistant.
Step 3: Open the Dashboard
Once the Gateway is running, launch the OpenClaw dashboard:
openclaw dashboardThis opens the web-based dashboard in your browser, where you can monitor your installation and confirm that OpenClaw is responding correctly.
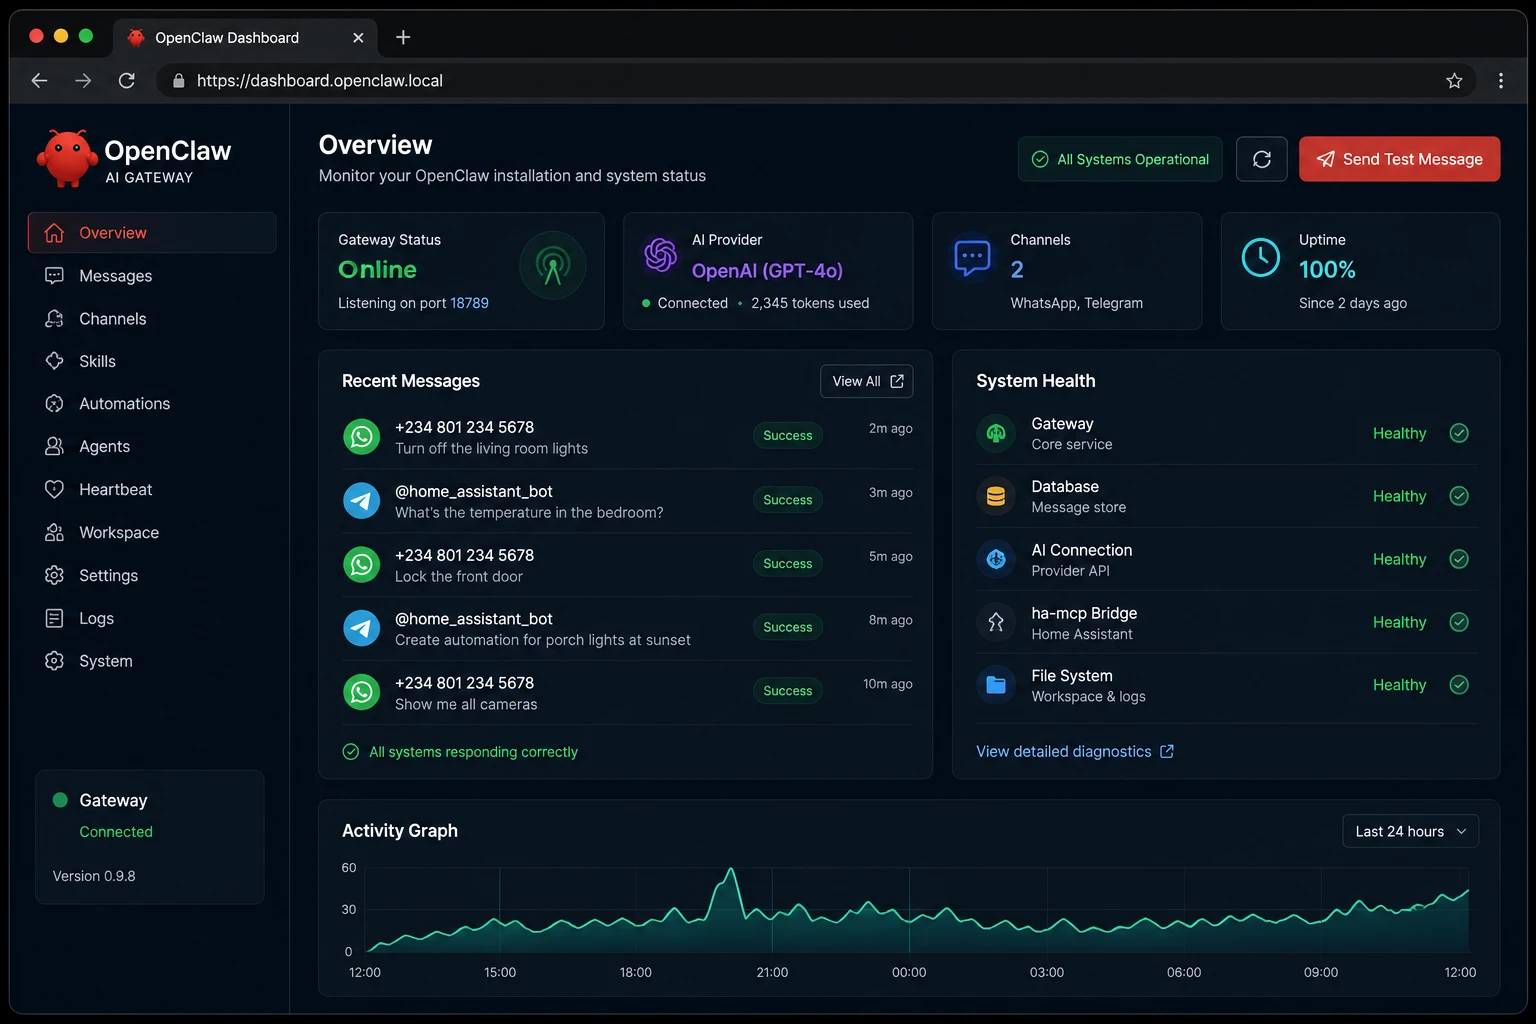
From the dashboard, you can:
- Check the overall health of your installation.
- View the status of connected services.
- Monitor Gateway activity.
- Confirm that your AI provider is connected.
- Send test messages to verify everything is working as expected.
If the dashboard loads without errors and responds to a test message, your OpenClaw installation is ready for the next step.
Step 4: Connect Your Telegram or WhatsApp
OpenClaw supports several messaging platforms, but Telegram is the easiest place to start.
Unlike WhatsApp, Telegram doesn’t require a second phone number. You simply create a bot using Telegram’s BotFather, copy the bot token, and connect it during the channel setup.
If you’d rather use WhatsApp, that’s supported too, although the setup involves pairing a dedicated phone by scanning a QR code.
To begin connecting a messaging channel, run:
openclaw channels loginOpenClaw will guide you through the authentication process for the channel you’ve chosen.
For WhatsApp, a QR code appears in your terminal or browser. Scan it using the dedicated phone or SIM card you’ve reserved for your assistant. Avoid linking your personal WhatsApp account, since every incoming message would be available to the AI agent.
After the pairing process finishes, send a simple test message.
A successful reply confirms that your messaging channel is connected and that OpenClaw is ready to receive commands from your phone.
Step 5: Connect to Home Assistant
OpenClaw doesn’t talk to Home Assistant directly. Instead, it sends requests to the ha-mcp server, which securely translates those requests into Home Assistant API calls. This is what lets OpenClaw discover devices, read sensor data, and control smart home entities like lights, switches, thermostats, and locks.
Home Assistant protects its API with authentication, and ha-mcp needs permission before it can access your installation. That permission comes from a Long-Lived Access Token (LLAT).
A LLAT works like a secure API key. It tells Home Assistant that ha-mcp is authorized to interact with your installation without requiring you to sign in every time a request is made.
To create one:
- Open your Home Assistant dashboard.
- Select your user profile.
- Scroll to the Long-Lived Access Tokens section.
- Create a new token.
- Copy the token and store it somewhere safe.
Next, add your Home Assistant URL and the access token to your OpenClaw configuration. Once both are configured, ha-mcp can establish a secure connection between OpenClaw and Home Assistant.
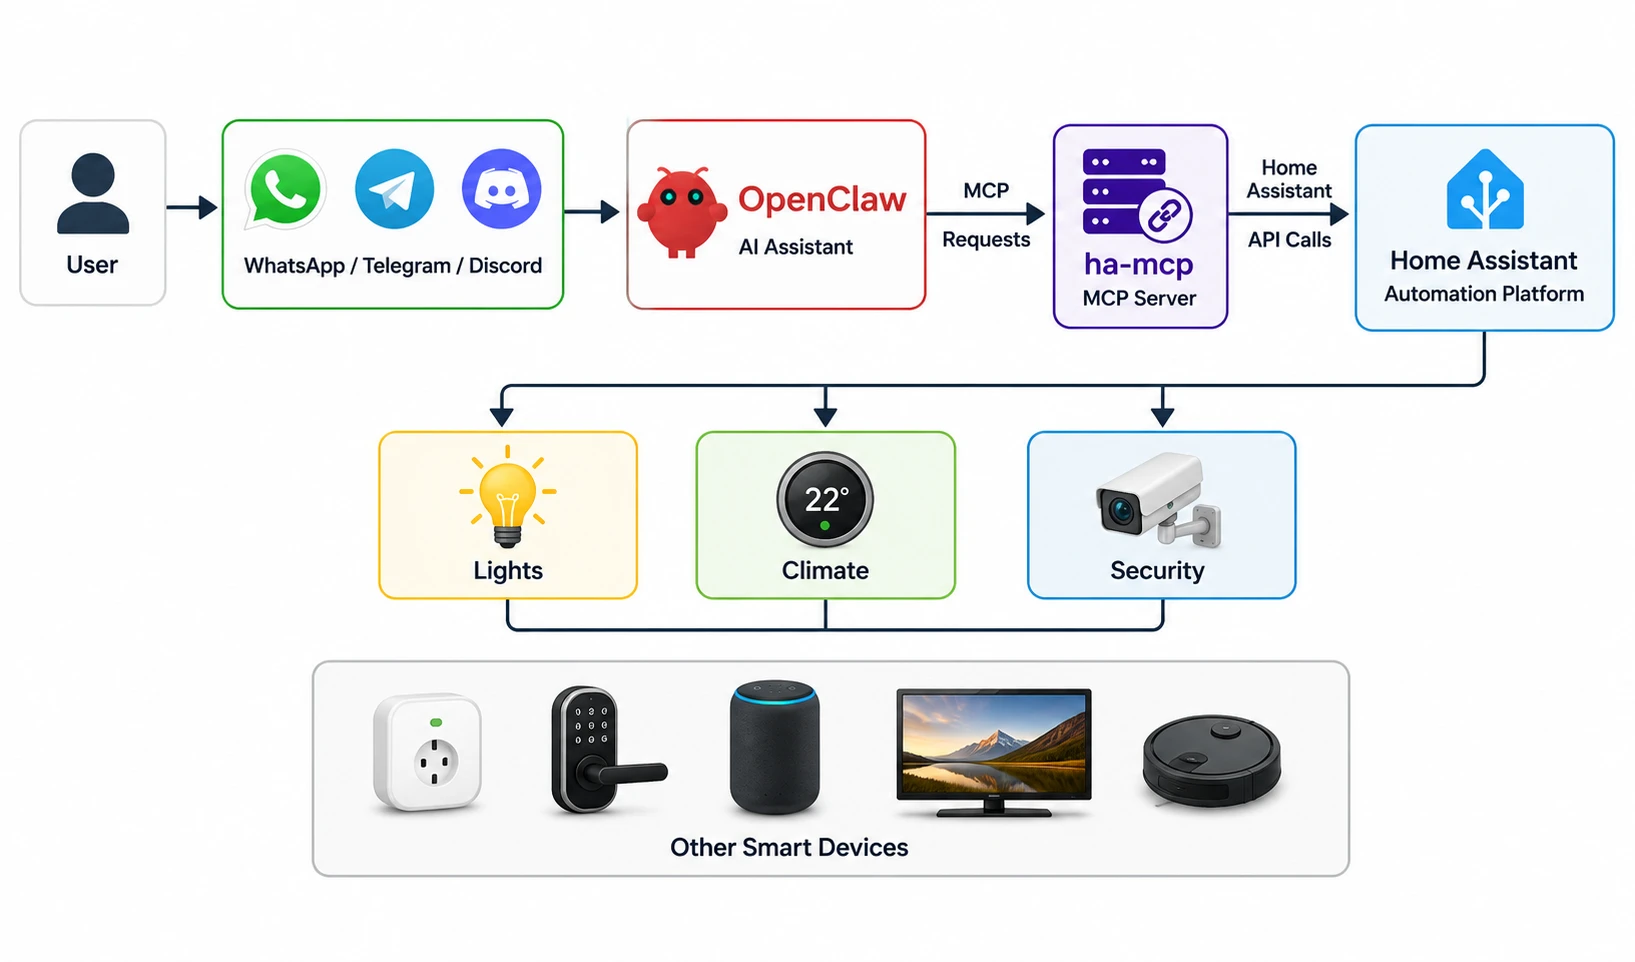
After the connection is complete, OpenClaw automatically discovers the devices and entities that Home Assistant exposes. From there, you can begin controlling your home through natural conversations instead of going through dashboards and menus.
Step 6: Configure the Workspace
One of OpenClaw’s strengths is that it remembers information about your environment. That memory comes from its workspace.
The default workspace is stored in:
~/.openclaw/workspaceRather than storing instructions in a database, OpenClaw reads them from Markdown files inside this directory. As these files grow, your assistant gradually becomes more familiar with your home, your routines, and your preferences.
Three files are especially important:
- AGENTS.md: defines your agent’s behavior, tools, and task scope
- SOUL.md: sets its persona, tone, and communication style
- HEARTBEAT.md: tasks OpenClaw checks on its own, every 30 minutes by default
This is where you teach OpenClaw about your home over time. If your Xiaomi TV has quirks, write them in a skill file. If a particular automation needs special handling, document it. The workspace is effectively OpenClaw’s long-term memory.
Since these files become increasingly valuable over time, it’s a good idea to store the workspace in a private Git repository.
This gives you version history, makes backups much easier, and allows you to restore your assistant’s knowledge if you ever move to another server.
Step 7: Test It, and What a Working Setup Looks Like
From your personal phone, message the assistant number:
“Turn off the kitchen lights.”
A working setup replies with a confirmation, and the lights go off within seconds.
If nothing happens, run:
openclaw status --deepThis command performs a deeper health check, helping you identify problems with your gateway, messaging channels, AI provider, Home Assistant connection, or other parts of your setup.
Fix any reported issues before moving on to regular use. Once this final test succeeds, your OpenClaw Home Assistant is fully operational and ready for everyday tasks.
Locking Down Your Setup (Security in 3 Rules)
Security researchers found over 30,000 publicly exposed OpenClaw instances in early 2026, most of them misconfigured.
Because OpenClaw needs broad permissions to control your home, a compromised instance gives an attacker access to your devices, your files, and your local network.
Three rules to put in place from day one:
1. Lock the allowlist: Only your phone number should reach the agent. In your openclaw.json, set the allowFrom field to your personal number and nothing else.
2. Require confirmation for destructive actions: Some actions should never execute immediately, like creating automations, deleting automations, restarting Home Assistant, and removing devices.
Configure your agent to require “yes,” “confirm,” or “ok” before any persistent change goes through. Turning on a light doesn’t need a gate. Deleting a scene does.
3. Disable heartbeats initially: Heartbeats run every 30 minutes by default and consume API tokens every cycle.
Set agents.defaults.heartbeat.every: "0m" in your config until you’ve verified everything is working the way you expect. Turn them back on when you’re ready for proactive mode.
OpenClaw Home Assistant FAQs
Do I need coding experience?
Basic comfort with a terminal helps, but the onboarding wizard handles most of the setup. If you’re on a Truehost OpenClaw VPS, the installation step is already done before you log in.
Is OpenClaw free?
The software is open-source under the MIT license. You pay for two things: AI model API tokens (billed by usage to Anthropic, OpenAI, or Google) and the server that runs OpenClaw.
Can I use Telegram instead of WhatsApp?
Yes, and for a first setup, Telegram is the easier path. You just need a bot token. No second SIM, no QR scan.
What happens if my VPS goes down?
Your assistant goes offline until the server is back up. That’s why uptime and DDoS protection is important. Both are included on Truehost OpenClaw plans.
Can it control any Home Assistant device?
If Home Assistant can see the device and it’s exposed to the Assist pipeline, OpenClaw can control it, from lights, thermostats, locks, sensors, cameras, scenes, and more.
Where to Host OpenClaw in Nigeria
Unlike a regular desktop application, OpenClaw relies on its gateway to stay connected to your messaging platform.
If the Gateway goes offline, your assistant can no longer receive messages or control your Home Assistant devices.
Running OpenClaw on your personal computer may work for testing, but it’s less suitable for everyday use. Shutting down your computer, losing power, or disconnecting from the internet will interrupt your assistant until everything is running again.
A VPS provides a much more reliable environment. Your OpenClaw Gateway stays online around the clock, giving you access to your assistant whenever you need it, be at home or away.
If you’re looking for a hosting solution in Nigeria, we’ve built our OpenClaw VPS hosting plans specifically to remove that friction.
They come with Naira billing, a pre-configured environment, DDoS protection, daily backups, and support that understands the Nigerian infrastructure.
The Starter plan costs NGN 10,500 per month billed triennially and comes with enough resources to handle a typical home assistant setup comfortably. Pro and Business are worth it if you’re running multiple agents, heavier automation workloads, or supporting a team.
Now you know how to set this up. The only thing left is picking a plan and getting the Gateway running.