 Domain NamesFind and register your ideal domain name instantly.
 Web HostingEasy-to-use hosting powered by cPanel — ideal for managing websites in Nigeria.
 Windows HostingRun .NET apps with Windows-optimized hosting
 Affiliate ProgramMake money promoting our services
 Reseller HostingMake money by reselling our hosting products under your own brand
 .COM Domains
 All DomainsExplore all supported tld domains in Nigeria
 WhoisFind out who owns any domain, as well as verify your registration details
 VPS Hosting
 Dedicated ServersReimagine your site speed with your own complete server
 AI Website BuilderDesign your site with drag-and-drop tools
 Online Store BuilderStart your online shop without code
 Support PortalFind answers or get expert help
 Contact UsReach our team via chat or email
 BlogRead our extensive guides on web hosting and more
If you have been running your business with a free Gmail or Yahoo address, you already know the problem. Clients notice. Partners notice.
And even if nobody says anything out loud, a generic email address quietly signals that your business is not quite there yet.
The fix is straightforward: get professional email on your own domain, and one of the best ways to do that is through Google Workspace.
Learning how to host email on Google Workspace is not as complicated as it looks from the outside, but there are a few steps that trip people up, especially around DNS records and domain verification.
Skip one thing or enter a value incorrectly, and you could spend hours wondering why emails are not arriving or why your domain still shows as unverified.
This guide walks you through the entire process from start to finish, in plain language, so you can get your business email and collaboration tools running without unnecessary back and forth.
What You Need Before You Start
Before you touch anything, gather a few things.
Having these ready beforehand saves you from stopping halfway through the setup to go hunting for information.
- Your organisation’s name. This appears across your Google Workspace account and admin settings, so use the name you actually operate under.
- Your country or region. Used during the initial sign-up process for billing and setup purposes.
- A working email address. Not the one you are trying to create, a current personal or business email where Google can send setup updates, verification links, and account alerts during the process.
- Your domain name. This is the domain you want professional email on. Something like yourcompany.com or yourbrand.ng. If you do not already own one, you can register a domain directly during the Google Workspace sign-up flow, which keeps things simple.
- Access to your domain’s DNS settings. This is the part most people are least familiar with, and it is where a lot of setup mistakes happen. Your DNS settings live at your domain registrar, wherever you purchased or transferred your domain. Common examples include Truehost, Namecheap, GoDaddy, Bluehost, or your web hosting provider if they also manage your domain. You will need to be able to log in and add or edit records there.
Once you have all of that, you are ready to begin.
Step 1: Sign Up for Google Workspace
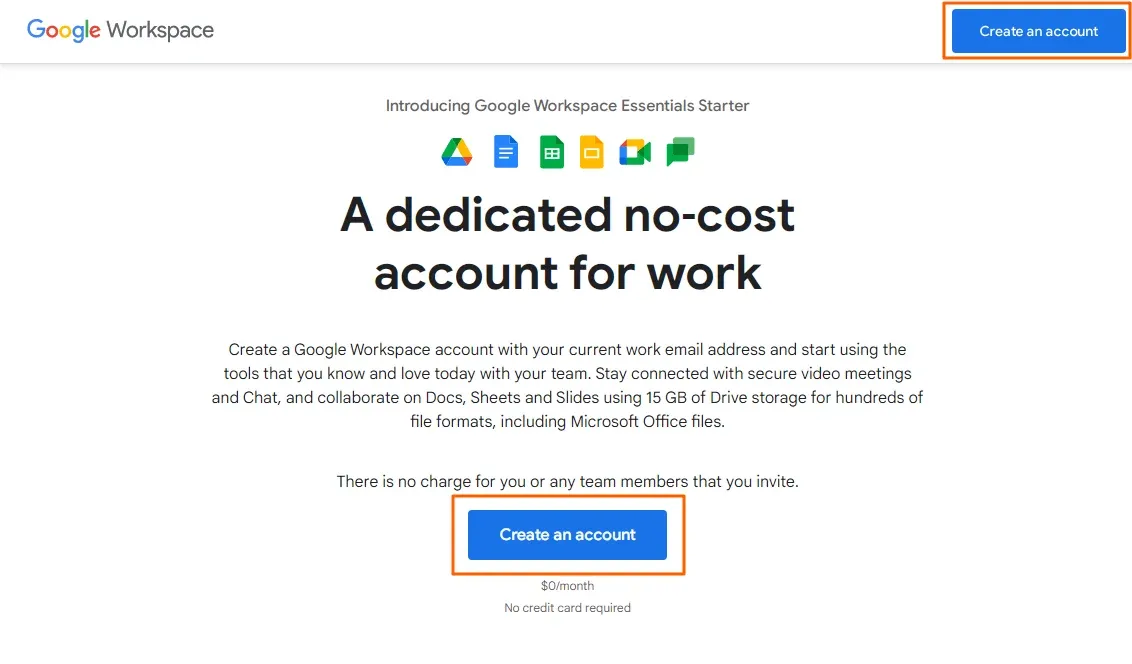
The first step is picking a plan and creating your Google Workspace account.
Head to the Google Workspace website and choose the plan that fits your business.
The main options for small and medium businesses are Business Starter, Business Standard, and Business Plus.
Business Starter is the entry point and covers professional email, video calls through Meet, shared calendars, and 30 GB of pooled Drive storage per user.
Business Standard adds more storage, larger meeting capacity, and the ability to record video calls. Business Plus goes further with enhanced security features and more administrative controls.
During sign-up, you will enter the number of users you need, your organisation name, and your country. You can sign up using a current Gmail address or another email address.
If you use a non-Gmail address, Google will send a verification link to that address to confirm it is working.
One thing worth knowing: if you have ten or fewer users, Google offers a free trial so you can test things out before committing to a paid plan.
For most small businesses, that is more than enough runway to verify the setup works correctly before the first charge hits.
Step 2: Verify Your Domain Ownership
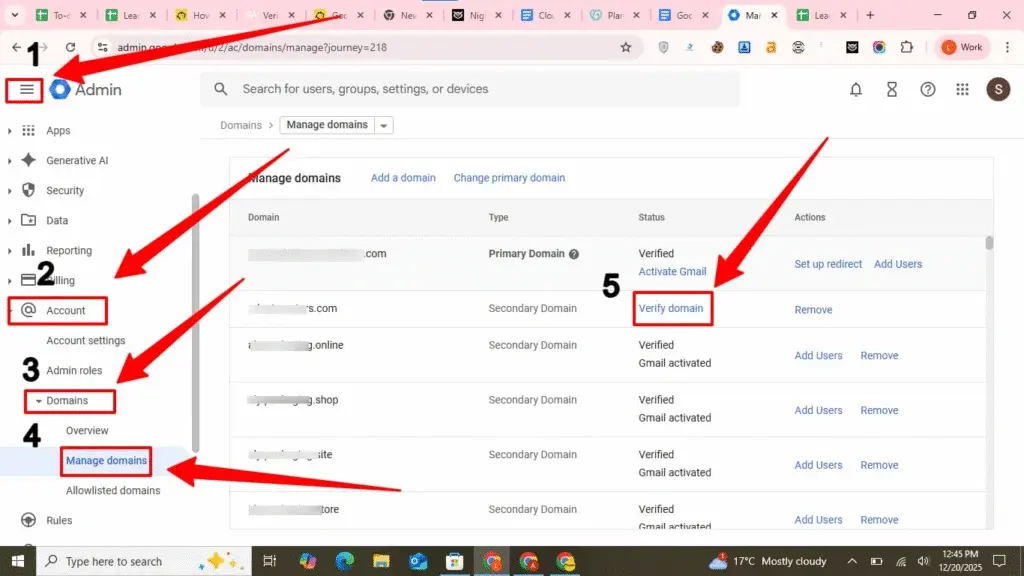
Before Google Workspace will activate your custom domain, you need to prove you actually own it.
This is a standard security step, without it, anyone could theoretically set up email on someone else’s domain.
Google does this by giving you a unique TXT verification record. You add that record to your DNS settings, Google checks for it, finds it, and confirms ownership.
The whole thing takes about five minutes to set up, though you may need to wait for DNS propagation before Google can confirm it.
Here is how to do it:
- Log in to your Google Workspace Admin Console at admin.google.com.
- Navigate to Domains, then Manage Domains.
- Find your domain in the list and click Verify domain under the Status column. Google will display a TXT record, it will look something like a long string of random characters.
- Copy that value exactly. Now open a new browser tab and log in to your domain registrar or DNS hosting provider.
- Look for the DNS management section, it might be labelled DNS settings, Zone file, or Advanced DNS depending on your provider.
- Add a new TXT record and paste in the value Google gave you. Save the record.
- Go back to the Google Admin Console and click Verify.
If it works immediately, great. If it shows an error, do not panic. DNS changes take time to propagate, sometimes a few minutes, sometimes up to eight hours.
Wait a while and try clicking Verify again. The most common mistake here is copying the TXT value incorrectly, so double-check what you pasted if things are not working after a reasonable wait.
Step 3: Add MX Records for Email Delivery
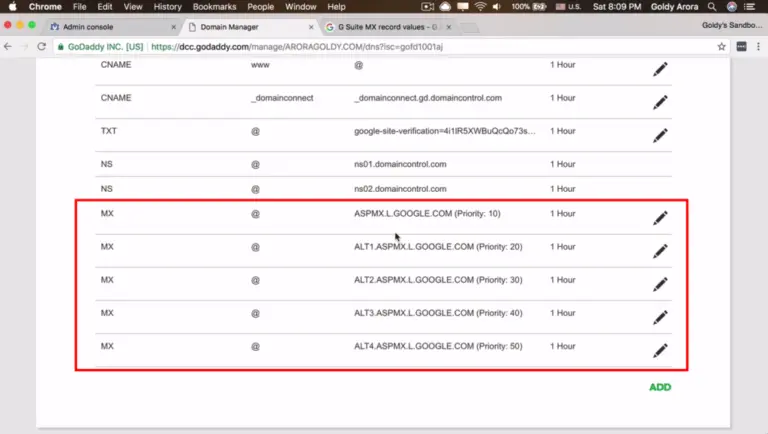
Domain verification proves you own the domain. MX records are what actually make email work. Without them pointing to Google, messages sent to your domain have no idea where to go.
This is arguably the most important step in the whole process. It is also where a lot of people get stuck because they forget to remove their old MX records before adding Google’s new ones.
Here is how to do it:
- Go back to your domain’s DNS management panel.
- Find the MX records section.
- Before you add anything new, remove any existing MX records that are pointing to your previous email provider. Leaving old records alongside new ones causes routing confusion. Some messages might go to the old server, some to Google, and you will have no reliable way to know which.
Once the old records are cleared, add Google’s primary MX record:
| Priority | Host | Points to |
|---|---|---|
| 1 | @ or leave blank | smtp.google.com |
Google has a full list of MX records in their official help documentation. Add all of them in order of priority. Save your changes when done.
If your domain is registered with the same provider where you bought Google Workspace, the system may automatically prompt you to update DNS records.
If you are using a different registrar or nameserver provider, you will need to add these manually as described above.
After saving, it can take anywhere from a few minutes to 48 hours for the MX changes to fully propagate.
Most of the time it is much faster than that, but it is worth knowing the upper limit so you are not worried if emails do not start flowing instantly.
Step 4: Create User Accounts and Email Addresses
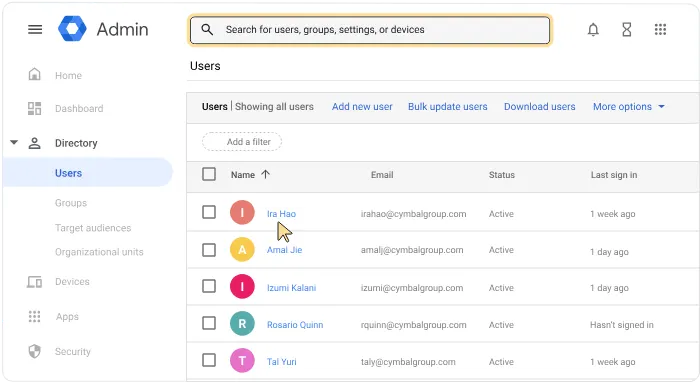
With your domain verified and MX records in place, you can now start creating email accounts for yourself and your team.
- Log in to the Google Admin Console.
- Go to Menu, then Directory, then Users.
- Click Add new user at the top of the users list.
- Enter the user’s name, the email address you want to assign them, and a temporary password.
- Click Add to create the account.
Each user gets their own address in the format [email protected] and immediate access to all the Google Workspace tools included in your plan, Gmail, Google Drive, Docs, Sheets, Slides, Meet, and Calendar.
You can create as many user accounts as your plan allows.
For a small team, you might be setting up five accounts in one sitting. For a larger organisation, you can also import users in bulk via a CSV file rather than adding them one by one.
One thing that catches people off guard: if someone on your team already uses Gmail personally, their personal Google account and their new Google Workspace account are completely separate.
They will need to log in specifically with their Workspace credentials to access the business account.
Setting them up in a separate browser profile or using Chrome’s built-in profile switcher makes this much easier to manage day to day.
Step 5: Set Up SPF, DKIM, and DMARC
This step is the one most business owners skip, and it is a mistake.
SPF, DKIM, and DMARC are email authentication protocols that protect your domain from spoofing and significantly improve your email deliverability.
Without them, your legitimate emails are far more likely to land in spam folders, and anyone could potentially send emails that appear to come from your domain.
Google actually requires bulk senders to have SPF and DKIM configured and a DMARC policy published. Even if you are not a bulk sender, getting these right is simply good practice.
- Setting up SPF
SPF tells receiving mail servers which servers are authorised to send email on behalf of your domain. Add the following as a TXT record in your DNS:
v=spf1 include:_spf.google.com -allOne technical note: Google’s include directive uses four of your ten available DNS lookups.
If you use other third-party email services alongside Google Workspace, for example, a CRM that sends automated emails on your domain’s behalf, watch your total lookup count.
Exceeding ten will cause SPF to fail.
- Enabling DKIM
DKIM adds a digital signature to every email you send.
Receiving mail servers use this signature to verify the message genuinely came from your domain and was not altered in transit.
- Go to Google Admin Console, then Apps, then Google Workspace, then Gmail.
- Click Authenticate email.
- Select your domain and click Generate new record.
- Choose the 2048-bit key length, this is the recommended option and the more secure choice.
- Copy the TXT record value that Google generates and add it to your DNS as a TXT record at the
host google._domainkey.yourdomain.com. - Once that is saved, return to the Google Admin Console and click Start authentication.
- Publishing a DMARC Record
DMARC tells receiving mail servers what to do with messages that fail SPF or DKIM checks. You can instruct them to do nothing, quarantine the message, or reject it outright.
Start with a monitoring policy:
v=DMARC1; p=none; rua=mailto:[email protected]The p=none setting means no action is taken on failing emails, you are just collecting reports.
Analyse those reports for at least a full quarter, identify any legitimate email sources that are failing authentication, fix them, and then move to p=quarantine or p=reject once you are confident everything is properly configured.
Do not jump straight to p=reject before you understand your sending patterns. It is one of the more common ways businesses accidentally start rejecting their own legitimate emails.
Step 6: Migrate Existing Email Data (Optional)
If you are moving from another email provider, whether that is cPanel webmail, Hostinger, Namecheap, or another service, you can bring your existing emails, contacts, and calendar data across to Google Workspace using Google’s built-in Data Migration Service.
Here is how to do it:
- Log in to the Google Admin Console.
- Go to Menu, then Data, then Data import and export, then Data migration.
- Select Other IMAP server as the source (this works for most standard email hosts).
- Enter your source server’s IMAP settings, along with the email address and password for each account being migrated.
Map the source mailboxes to the corresponding Google Workspace user accounts. Once mapped, start the migration.
The data transfer runs in the background, so you can proceed with updating your MX records and setting up users while the migration is happening.
This approach works for the vast majority of shared hosting email configurations including cPanel, Plesk, Roundcube, and Horde.
If your previous provider used something less standard, you may need to export your emails manually as a PST or MBOX file and import them through Gmail’s import tool instead.
Common Setup Mistakes to Avoid
Knowing what to watch out for saves real time. These are the issues that come up most often:
- Domain verification keeps failing. Usually means the TXT record was not copied correctly, or DNS has not propagated yet. Double-check the value character by character and wait 30 to 60 minutes before trying again.
- Emails are not arriving after setup. Almost always caused by old MX records still sitting in DNS alongside the new Google ones. Go back and confirm the old records were fully deleted before the new ones were added.
- Emails are landing in spam. This happens when SPF, DKIM, or DMARC have not been configured. Complete all three authentication steps in Step 5 and give it a day or two for the records to propagate and take effect.
- Cannot access the Admin Console. Often because you are logged into a personal Google account in the same browser. Open an incognito window, or log out completely and sign back in with your Google Workspace admin credentials.
- Account creation conflicts. If a new user’s email address is already linked to a personal Google account, there will be a conflict. The cleanest fix is to create the Workspace account with a slightly different address first, then adjust once the personal account conflict has been resolved.
Next Steps After Setup
Once your Google Workspace email is live and delivering correctly, a few additional steps will help you get the most out of the platform:
- Set up email aliases. You can create alternate email addresses for existing users at no extra cost. Useful for things like info@, support@, or sales@ that all forward to the same person.
- Add secondary domains. If your business operates under more than one domain name, you can manage all of them from a single Google Workspace account.
- Configure mobile access. Set up Gmail on your team’s smartphones and tablets so everyone can access their professional email on the go. The Gmail app handles Google Workspace accounts natively with no extra configuration needed.
- Introduce your team to the full workspace. Google Docs, Sheets, Meet, Drive, and Calendar are all included in your plan. Walking your team through the basics early makes adoption much smoother than leaving them to figure it out on their own.
Knowing how to host email on Google Workspace gives your business a serious upgrade, professional branded email, industry-leading spam protection, and a full suite of collaboration tools all connected in one place.
The setup process typically takes between 30 minutes and a few hours, depending mostly on how quickly your DNS changes propagate.
Take it one step at a time, double-check each record before saving, and give propagation the time it needs before assuming something is broken.
Once it is all configured correctly, you have an email setup that is genuinely built to scale with your business, and you never have to apologise for your email address again.