 Domain NamesFind and register your ideal domain name instantly.
 Web HostingEasy-to-use hosting powered by cPanel — ideal for managing websites in Nigeria.
 Windows HostingRun .NET apps with Windows-optimized hosting
 Affiliate ProgramMake money promoting our services
 Reseller HostingMake money by reselling our hosting products under your own brand
 .COM Domains
 All DomainsExplore all supported tld domains in Nigeria
 WhoisFind out who owns any domain, as well as verify your registration details
 VPS Hosting
 Dedicated ServersReimagine your site speed with your own complete server
 AI Website BuilderDesign your site with drag-and-drop tools
 Online Store BuilderStart your online shop without code
 Support PortalFind answers or get expert help
 Contact UsReach our team via chat or email
 BlogRead our extensive guides on web hosting and more
You push your code. Then you hold your breath.
Did the build pass? Did you forget an env variable? Is the site about to go down for every visitor in Lagos?
That feeling is why an openclaw deployment assistant exists.
It’s not a separate app you buy. It’s a purpose-built OpenClaw agent, set up to do one job well: manage your deployments, not your whole life.
Here’s what it does:
- Looks at your project
- Detects the framework
- Works out the build command
- Flags missing env vars
- Generates config files for you
And it does all of this with one rule baked in. It explains before it acts. It waits for your approval before touching anything close to production.
This guide shows you how to build one, step by step.
We’ll research every claim as we go, so you get real commands and real numbers, not guesses.
What You Need to Create an OpenClaw Deployment Assistant
Before you start, check off these basics.
- Node.js: 22.22.3+, 24.15+, or 25.9+ on whatever machine runs the Gateway. Node 24 is recommended. Node 23 is not supported.
- An API key from a model provider. Anthropic, OpenAI, or Google all work.
- A messaging channel. Telegram is the fastest to set up. Slack and Discord work too.
- A server that stays on. A laptop is fine for testing.
But think about what happens when the grid goes down.
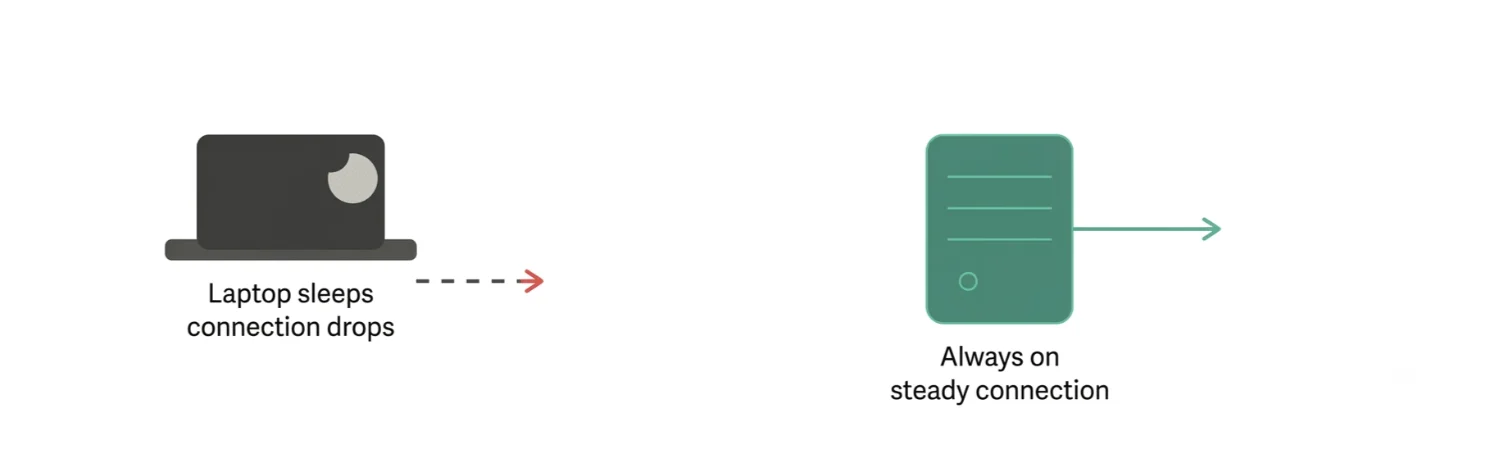
If NEPA cuts power and your laptop sleeps, your assistant goes with it. Mid-deployment. No warning.
That’s the case for hosting your deployment assistant somewhere that doesn’t sleep. We built OpenClaw Hosting at Truehost for this reason. It’s pre-configured, always-on, and ready before you finish your coffee.
Here’s what it costs:
| Plan | Price | vCPU | RAM | Storage | Bandwidth |
|---|---|---|---|---|---|
| OpenClaw Starter | ₦14,000/month | 1 core | 2 GB | 50 GB NVMe | 4 TB |
| OpenClaw Pro | ₦28,000/month | 2 cores | 4 GB | 100 GB NVMe | 6 TB |
| OpenClaw Business | ₦63,000/month | 4 cores | 8 GB | 200 GB NVMe | 8 TB |
If you’re deploying multiple projects a week, the Pro plan gives you comfortable headroom. Check our OpenClaw Hosting plans and skip the manual server setup entirely.
Step 1: Install OpenClaw and Get the Gateway Running
You have two paths here. One is fast. One is manual.
The fast path: skip installation entirely. Truehost’s pre-configured OpenClaw Hosting comes with the Gateway already running. You log in and start building your agent.
The manual path: run the standard installer.
curl -fsSL https://openclaw.ai/install.sh | bash
This is the recommended install command. It checks your Node version, installs Git if needed, and sets up the Gateway.
You can also install via npm:
npm install -g openclaw@latest
Treat this as a secondary method. The install script handles more edge cases for you.
On Windows, you have three options. The native Windows Hub app. A PowerShell installer. Or WSL2, if you prefer a Linux-style setup.
Once installed, verify everything works.
openclaw --version
openclaw doctor
openclaw gateway status
openclaw doctor is worth running early. It flags missing dependencies before they cause confusing errors later.
Step 2: Create a Dedicated Deployment Agent
Here’s a rule that saves you real pain: never reuse your personal assistant for deployment work.
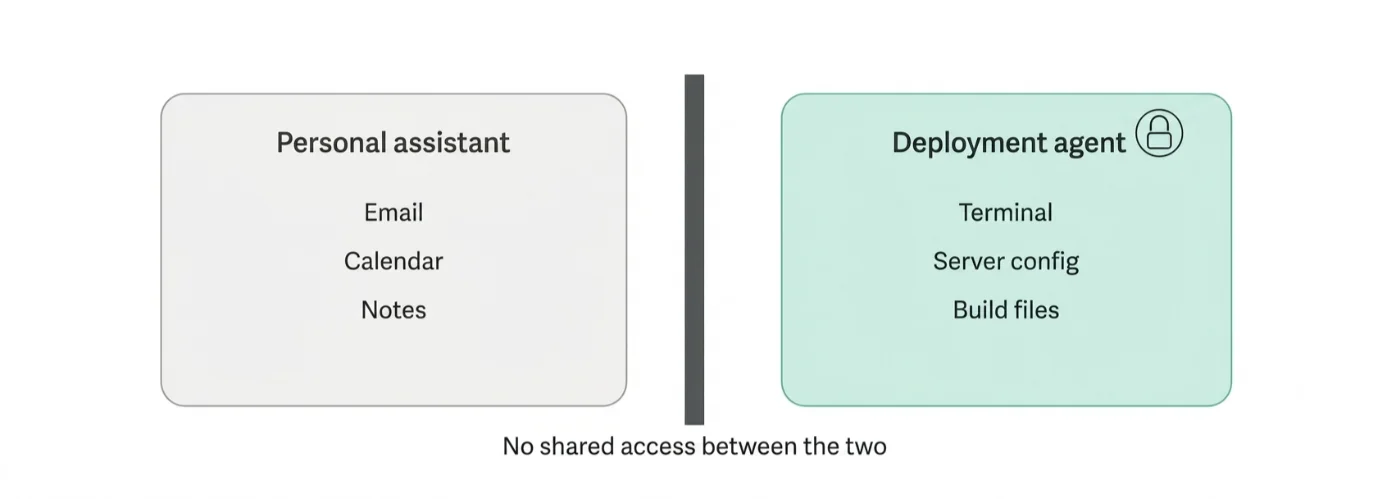
Think of it like a key that unlocks everything. Your everyday agent already touches your email, your calendar, your notes.
None of that belongs anywhere near a process that runs shell commands on a live server.
One compromised prompt, one bad instruction, and your personal agent’s access becomes your production server’s access.
Create a separate agent instead.
openclaw agents add deployer --workspace ~/.openclaw/workspace-deployer --bind telegram:deployments
This gives your deployment agent its own workspace, its own memory, and its own binding. It never sees your inbox. It never sees your calendar. It only sees deployment work.
Step 3: Give the Agent an Identity
Every OpenClaw agent needs a file that defines its job description and its code of conduct in one place.
Call this file IDENTITY.md, and place it in the agent’s workspace.
Write it with explicit boundaries. Tell the agent what it can do, and what it cannot.
Here’s a sample:
# IDENTITY.md — Deployment Agent

## Role
You manage deployments for the projects assigned to you. Nothing else.

## You CAN
- Read project files (package.json, Dockerfile, .env.example, CI config)
- Run build and test commands
- Generate config files (netlify.toml, Dockerfile, GitHub Actions workflows)
- Suggest fixes for failing builds

## You CANNOT
- Delete files or databases
- Change DNS records without explicit approval
- Push directly to production without confirmation
- Access any workspace other than your own

## Core rule
Prepare. Explain. Ask before executing.
That last line is more important than anything else in the file. Prepare, explain, then ask before executing. Build this rule into every skill and playbook you write next.
Step 4: Build the Deployment Skill
A skill in OpenClaw is a Markdown instruction file. It has YAML frontmatter up top, and a workflow written in plain English below it.
Set up the directory:
mkdir -p ~/.openclaw/workspace-deployer/skills/deploy-assistant
cd ~/.openclaw/workspace-deployer/skills/deploy-assistant
touch SKILL.md
Here’s the workflow to write inside it:
---
name: deploy-assistant
description: Detects project type, prepares a deployment plan, and asks before deploying.
---

# Deployment Assistant

When asked to deploy a project, follow this workflow:

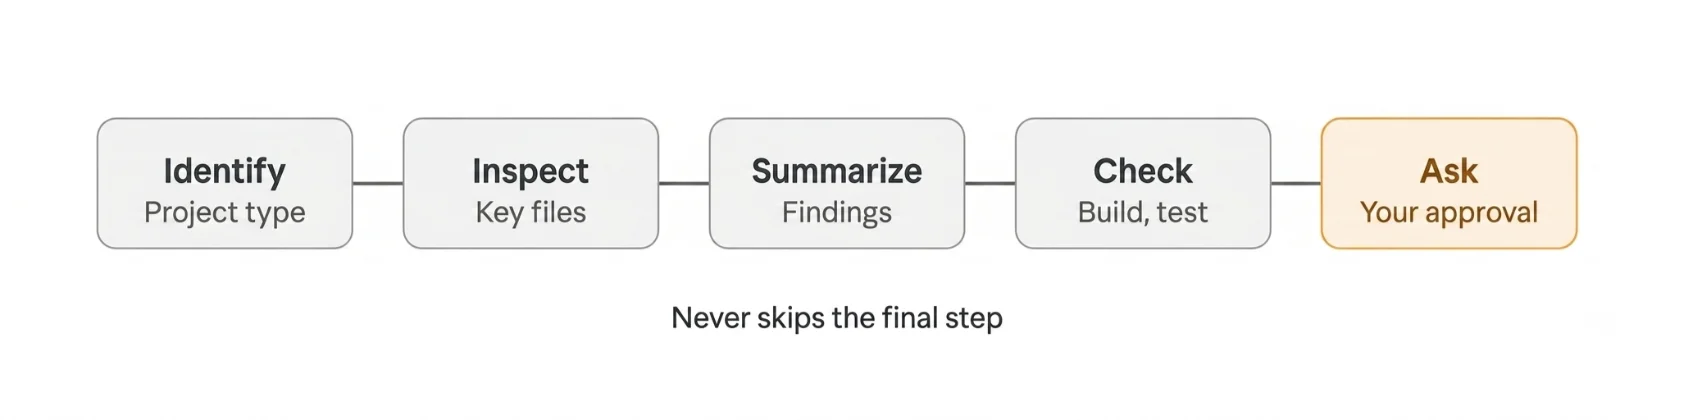
1. Identify the app type by inspecting the root directory.
2. Inspect key files: package.json, Dockerfile, .env.example, and any CI config.
3. Summarize your findings: framework, build command, required env vars, and target platform.
4. Run available checks (build, lint, test) and report results.
5. Ask for explicit confirmation before running any deploy command.
That five-step loop identify, inspect, summarize, check, ask, is the whole point of the assistant. It never skips step 5.
Step 5: Restrict What the Agent Can Access
Here’s why this step is non-negotiable. OpenClaw agents can touch messaging, tools, memory, and local execution, all at once, by default.
Give your deployment agent unrestricted skill access, and you’ve built a very capable, very risky tool.
Scope it down instead. Limit the deployer agent to only the skill it needs.
{
  "agents": {
    "deployer": {
      "skills": {
        "allow": ["deploy-assistant"]
      }
    }
  }
}
Now the agent can’t accidentally load a browsing skill, a file-deletion skill, or anything outside its lane.
Step 6: Add Per-Platform Playbooks
Skills tell the agent what to do. Playbooks tell it how to do it, consistently, for a specific platform.
Build one playbook per deployment target:
- Vercel
- Netlify
- GitHub Pages
- VPS / Docker
- cPanel
Here’s a sample playbook for Vercel:
# Playbook: Vercel

1. Detect the framework (Next.js, Vite, or React).
2. Confirm the build command matches Vercel's expected output directory.
3. Check for a vercel.json; generate one if missing.
4. Confirm required env vars are set in the Vercel dashboard.
5. Ask for confirmation, then run: vercel --prod
| Target | What the Assistant Handles |
|---|---|
| Vercel | Detects Next.js/Vite/React, configures build commands |
| Netlify | Identifies static/Vite apps, generates netlify.toml |
| GitHub Pages | Creates GitHub Actions workflows |
| VPS | Generates Dockerfiles, docker-compose.yml, Nginx configs |
| cPanel | Prepares build packages, .htaccess, PHP version notes |
If most of your projects run on a VPS, our VPS hosting gives your assistant a stable target to deploy against, with full root access.
Step 7: Add Project-Level Instructions
Different repos need different rules. A Next.js app and a Django API don’t deploy the same way, and your assistant shouldn’t treat them the same way either.
Add a project-level file at this path:
my-app/.agents/DEPLOYMENT.md
A sample instructions file:
# DEPLOYMENT.md

## Project
my-app — Next.js frontend, deployed to Vercel

## Build command
npm run build

## Required env vars
- DATABASE_URL
- NEXT_PUBLIC_API_URL
- STRIPE_SECRET_KEY

## Rules
- Never deploy on Fridays after 4pm without explicit approval.
- Always run tests before suggesting a deploy.
- Confirm staging passed before touching production.
This file overrides nothing in IDENTITY.md. It adds project-specific context on top of it.
Step 8: Set Up Safety Gates
Not every command carries the same risk. Sort them into tiers, and give each tier its own rule.

| Command type | Example | Rule |
|---|---|---|
| Safe reads | ls, cat package.json, git status | Run freely |
| Build and test | npm run build, npm test | Run after notice |
| File edits | Creating config files | Show diff first |
| Deployment | vercel –prod, git push, scp | Confirm before running |
| Destructive | rm -rf, DB reset, DNS changes | Block unless explicitly approved |
Two more things here are non-negotiable: approval gates on anything destructive, and spending caps on your LLM API key.
Without a spending cap, a stuck loop or a runaway agent can burn through your API budget fast. Set the limit at your provider’s dashboard before you go further.
Step 9: Test the Full Loop
Don’t point this agent at a critical repo on day one. Pick something real but low-stakes.
Walk it through the full loop: detection, summary, build, confirmation, deployment.
Then break things on purpose:
- Remove an env var and see if it gets flagged.
- Introduce a failing test and see if the agent stops.
- Run a clean build and confirm it asks before deploying anyway.
The test that is most important: does it stop and ask? Not just say “checking now” while quietly moving ahead. If it deploys without asking even once, go back to Step 3 and tighten IDENTITY.md.
What a Real Conversation Looks Like
Here’s a sample exchange, from request to deploy.
You: Deploy my-app to Vercel.
Assistant: Detected a Next.js app. Build command is npm run build. Found 3 required env vars, 1 is missing: STRIPE_SECRET_KEY. Want me to run a local build check first?
You: Yes, go ahead.
Assistant: Build failed. Error suggests STRIPE_SECRET_KEY is required at build time, not just runtime. Add it to your Vercel project settings, then I can retry.
You: Added it. Try again.
Assistant: Build passed. Ready to deploy to production. Confirm?
You: Confirmed.
Assistant: Running vercel --prod. Deployment live.
Notice what didn’t happen. It didn’t guess at the missing variable. It didn’t deploy on a failed build. It asked, twice.
Deployment Templates
Keep these on hand. Your assistant will generate versions of each, personalized to your project, but starting from a known-good base speeds things up.
netlify.toml
[build]
  command = "npm run build"
  publish = "dist"

[[redirects]]
  from = "/*"
  to = "/index.html"
  status = 200
GitHub Actions workflow (deploy.yml)
name: Deploy
on:
  push:
    branches: [main]
jobs:
  deploy:
    runs-on: ubuntu-latest
    steps:
      - uses: actions/checkout@v4
      - uses: actions/setup-node@v4
        with:
          node-version: 24
      - run: npm ci
      - run: npm run build
      - run: npm run deploy
Dockerfile
FROM node:24-alpine
WORKDIR /app
COPY package*.json ./
RUN npm ci --production
COPY . .
EXPOSE 3000
CMD ["npm", "start"]
docker-compose.yml
version: "3.9"
services:
  app:
    build: .
    ports:
      - "3000:3000"
    restart: unless-stopped
Best Practices When Creating Openclaw Deployment Assistant
A few rules keep this agent safe long after you’ve built it.
- Never let the deployment agent double as a general-purpose assistant. Keep it scoped.
- Keep destructive commands gated, no matter how much trust builds over time.
- Always stage or preview before production. No exceptions, even for tiny changes.
- Review your skill and playbook instructions periodically. Your stack changes. Your rules should too.
Troubleshooting Section
Work through each issue as symptom, likely cause, then fix.
Gateway and install issues
openclaw gateway statusshows “not running” → check for a Node version mismatch (Node 23 is unsupported), then restart the gateway.openclaw doctorflags errors → read its output carefully. Missing env vars and permission issues on config directories are the most common flags.
Agent and identity issues
- Agent ignores IDENTITY.md rules or acts outside scope → confirm it was bound correctly with
--workspace, and check it isn’t sharing config with your personal assistant. - Agent skips the “explain before acting” step → check whether a project-level DEPLOYMENT.md is conflicting with IDENTITY.md.
Skill and detection issues
- Assistant misidentifies the framework or build command → confirm package.json or Dockerfile are present and standard. Monorepos are a common edge case.
- Assistant doesn’t flag missing env vars → confirm .env.example exists and is current.
Permission and safety gate issues
- Agent attempts a blocked command → recheck the JSON config scoping from Step 5. Confirm it’s applied to the right agent, not the default one.
- Agent proceeds without asking → recheck the command tier mapping from Step 8 against what’s written in the skill file.
Deployment failures
- Build succeeds locally but fails through the assistant → check for environment parity. Node version and missing secrets on the server are common culprits.
- Platform-specific failures on Vercel, Netlify, GitHub Pages, VPS, or cPanel → go back to the relevant playbook from Step 6.
Connectivity and infrastructure issues (Nigeria-specific)
- Assistant goes unreachable mid-deployment → this ties straight back to the power point from the intro. A laptop sleeping through a NEPA outage takes your assistant down with it. Hosting on always-on infrastructure removes this risk entirely.
- Slow or dropped Telegram or Slack messages → check your server’s bandwidth tier. The Starter plan’s bandwidth may feel tight if you’re running heavy CI workloads.
LLM and API issues
- Assistant stalls or errors on complex repos → check the API key spending caps and rate limits from Step 8. You may be hitting a ceiling.
- Inconsistent responses → confirm which model provider is active, and if you’re facing a capacity issue or a config issue.
OpenClaw Deployment Assistant FAQs
What is an OpenClaw deployment assistant?
It’s a dedicated OpenClaw agent, scoped to one job: detecting your project setup, preparing a deployment plan, and asking for approval before it deploys anything.
Is it safe to give it access to my repos?
It’s safe when you scope it properly. Give it its own workspace, its own IDENTITY.md, and restrict its skills. Never let it share access with your personal assistant.
Can I use it for multiple projects?
Yes. Add a project-level DEPLOYMENT.md to each repo. The agent picks up project-specific rules on top of its core identity.
What LLM provider should I use?
Anthropic, OpenAI, and Google all work with OpenClaw. Pick based on your existing API relationships and your spending cap comfort level.
Can I run it on a local machine?
You can, for testing. For anything you rely on daily, an always-on server avoids the risk of a dropped connection mid-deployment.
Why Host Your Deployment Assistant on Truehost
Picture a build failure at 2 a.m. Or a hotfix that has to go out on a Friday evening, right before the weekend.
Your deployment assistant doesn’t get to clock out. It needs a server that doesn’t either.
That’s the whole argument for hosting it properly instead of running it off a laptop. No sleep mode.
No dropped connection when the power goes. No missed deploy window because your machine decided to update itself overnight.
We built OpenClaw Hosting at Truehost with this exact use case in mind. Clear Naira pricing, Nigerian support, and plans that scale as your CI workload grows:
| Plan | Price | vCPU | RAM | Storage | Bandwidth |
|---|---|---|---|---|---|
| OpenClaw Starter | ₦14,000/month | 1 core | 2 GB | 50 GB NVMe | 4 TB |
| OpenClaw Pro | ₦28,000/month | 2 cores | 4 GB | 100 GB NVMe | 6 TB |
| OpenClaw Business | ₦63,000/month | 4 cores | 8 GB | 200 GB NVMe | 8 TB |
Get started with OpenClaw Hosting on Truehost and give your deployment assistant a home that stays online as long as you need it to.