 Domain NamesFind and register your ideal domain name instantly.
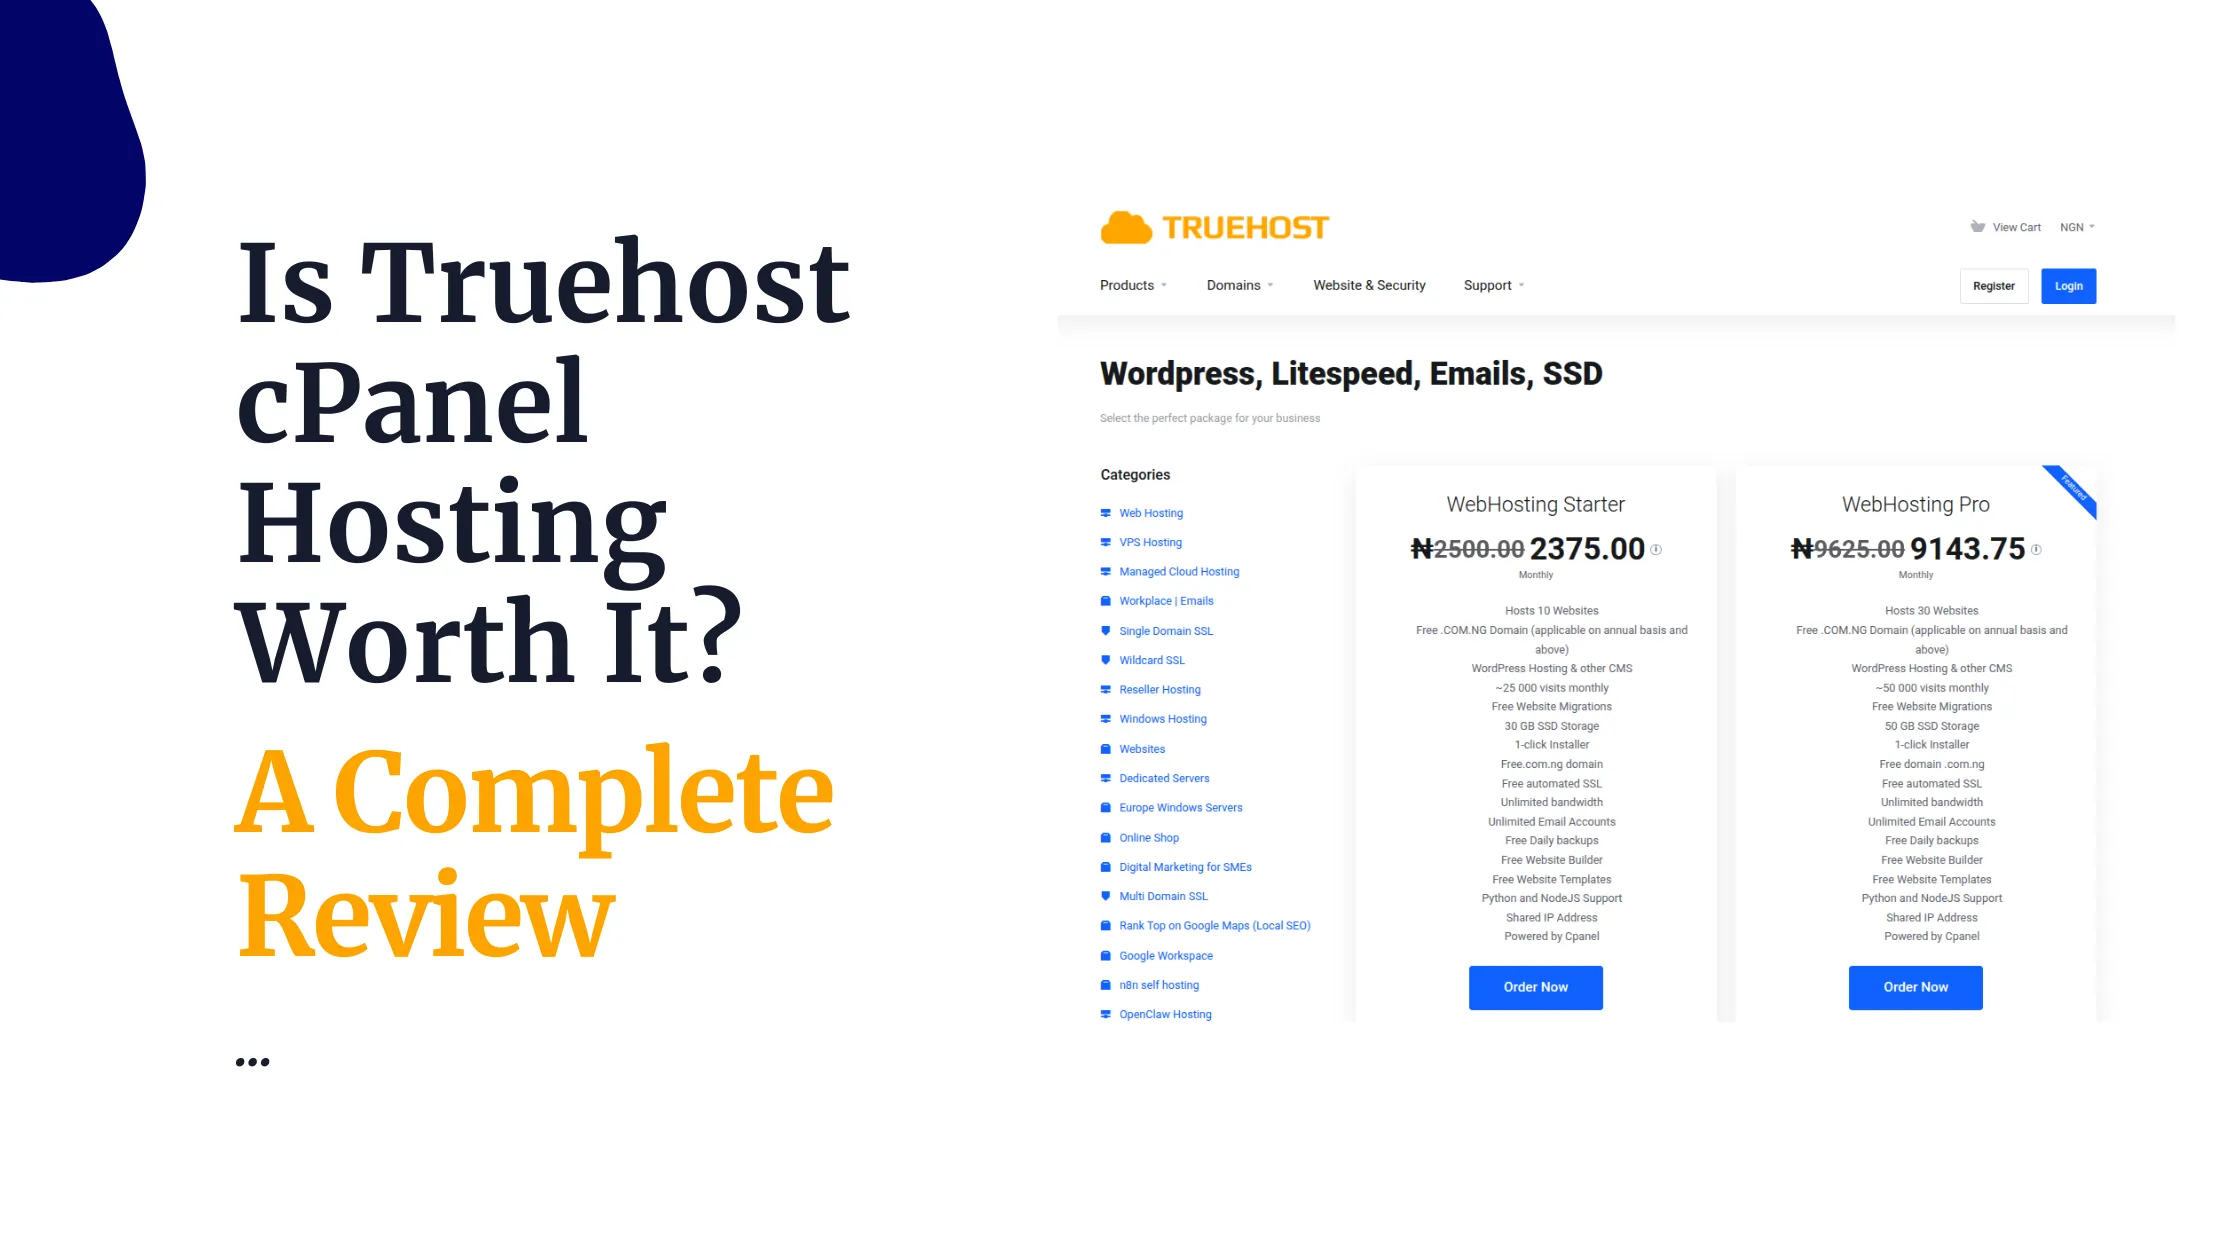
 Web HostingEasy-to-use hosting powered by cPanel — ideal for managing websites in Nigeria.
 Windows HostingRun .NET apps with Windows-optimized hosting
 Affiliate ProgramMake money promoting our services
 Reseller HostingMake money by reselling our hosting products under your own brand
 .COM Domains
 All DomainsExplore all supported tld domains in Nigeria
 WhoisFind out who owns any domain, as well as verify your registration details
 VPS Hosting
 Dedicated ServersReimagine your site speed with your own complete server
 AI Website BuilderDesign your site with drag-and-drop tools
 Online Store BuilderStart your online shop without code
 Support PortalFind answers or get expert help
 Contact UsReach our team via chat or email
 BlogRead our extensive guides on web hosting and more
If you are using n8n for serious automation workloads, self-hosting gives you more control over your environment, data, and costs. Instead of relying on a managed service, you run the stack on your own VPS and take responsibility for updates, security, storage, and maintenance.
This guide walks through a production-ready setup using Docker, PostgreSQL, Nginx as a reverse proxy, Let’s Encrypt TLS, firewall rules, and automated backups. It is written for users who are comfortable working in a terminal but may be new to server administration.
What you’ll need
- A VPS with at least 2GB RAM. 1GB can run n8n alone for light use, but Postgres alongside it wants headroom; under-provisioning here is the most common cause of containers that restart in a loop.
- Ubuntu 22.04 or 24.04 LTS. The commands below assume one of these; Debian 11/12 is nearly identical.
- A domain name you can point at the server (e.g., n8n.yourdomain.com). n8n’s webhook features and OAuth-based integrations require a real HTTPS domain; an IP address alone won’t work for those.
- SSH access to the server, with root or sudo privileges.
Step 1: Initial server setup
Connect to the server:
ssh root@your-server-ipUpdate the system, then create a non-root user with sudo access (skip the adduser step if one already exists):
apt update && apt upgrade -y
adduser deploy
usermod -aG sudo deploy
Log out and back in as deploy for the remainder of this guide. Running Docker and application services as root is an unnecessary risk for no benefit.
Step 2: Point your domain at the server
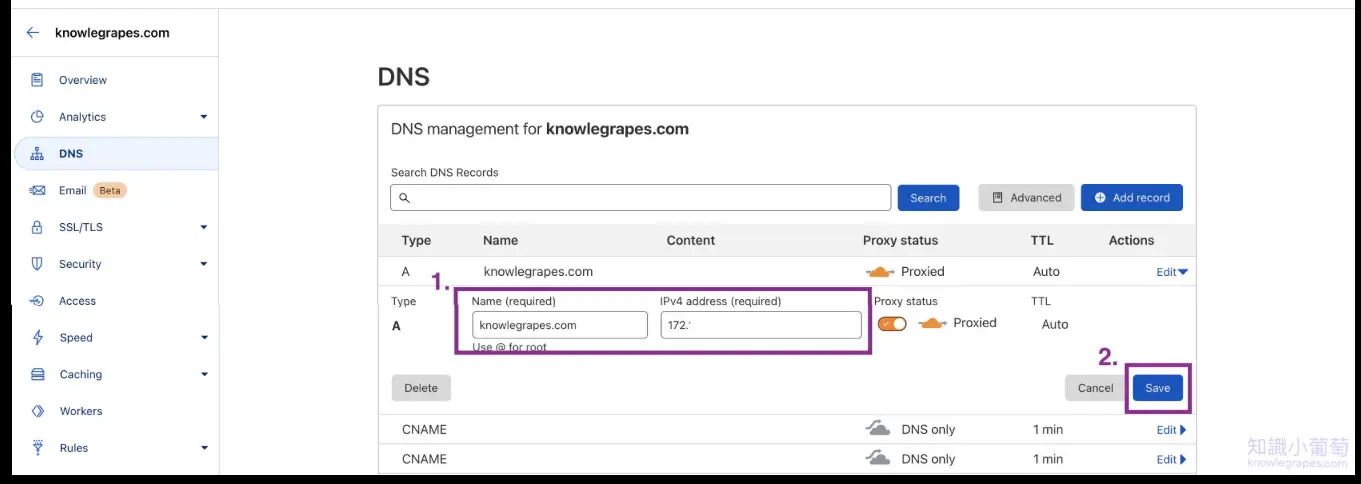
In your DNS provider’s dashboard, add an A record:
| Field | Value |
| Host | n8n (or whichever subdomain you prefer) |
| Value | your server’s public IPv4 address |
| TTL | Provider default is fine |
DNS propagation ranges from a few minutes to a few hours depending on your registrar and TTL. You can continue through the Docker and n8n setup while waiting; you’ll only need DNS resolved by Step 11, when Certbot issues the certificate.
Step 3: Install Docker and Docker Compose
Docker is the recommended install path. It isolates n8n and Postgres from the host OS and reduces updates to docker compose pull && docker compose up -d.
curl -fsSL https://get.docker.com | sh
sudo usermod -aG docker $USER
Log out and back in for the group membership to take effect, then confirm both are working:
docker --version
docker compose version
Docker Compose ships as a plugin (docker compose, no hyphen) with current Docker installs, no separate binary to fetch.
Step 4: Set up the project directory
Keep the compose file, environment file, and any local file mounts together so backups and upgrades stay simple:
mkdir -p ~/n8n-compose/local-files
cd ~/n8n-compose
Step 5: Generate your encryption key
n8n uses one key to encrypt stored credentials (API keys, tokens, passwords). Generate it before the first launch:
openssl rand -hex 32Store the output in a password manager or secrets vault.
This key is critical: losing it, or starting n8n without it, makes existing credentials unreadable. There is no recovery; services must be connected again. Set it once and always keep it configured.
Step 6: Create the .env file
nano ~/n8n-compose/.env# Domain
N8N_HOST=n8n.yourdomain.com
N8N_PORT=5678
N8N_PROTOCOL=https
NODE_ENV=production
WEBHOOK_URL=https://n8n.yourdomain.com/
N8N_PROXY_HOPS=1
# Timezone
GENERIC_TIMEZONE=Etc/UTC
# Encryption key
N8N_ENCRYPTION_KEY=paste-your-generated-key-here
# Postgres
POSTGRES_USER=n8n
POSTGRES_PASSWORD=use-a-long-random-password-here
POSTGRES_DB=n8nThree settings commonly cause issues:
N8N_PROXY_HOPS=1 tells n8n it is behind one reverse proxy (Nginx). Without it, n8n may detect the wrong IP or protocol, affecting webhooks and security checks.
WEBHOOK_URL must exactly match your public HTTPS URL. If it is wrong, webhook URLs may look correct in n8n but fail when external services call them.
GENERIC_TIMEZONE controls scheduled workflows. The wrong timezone causes Cron jobs to run at unexpected times.
Replace the domain, encryption key, and database password values before continuing.
Step 7: Write the Docker Compose file
nano ~/n8n-compose/docker-compose.ymlservices:
postgres:
image: postgres:16
restart: unless-stopped
environment:
- POSTGRES_USER=${POSTGRES_USER}
- POSTGRES_PASSWORD=${POSTGRES_PASSWORD}
- POSTGRES_DB=${POSTGRES_DB}
volumes:
- postgres_data:/var/lib/postgresql/data
healthcheck:
test: ["CMD-SHELL", "pg_isready -U ${POSTGRES_USER} -d ${POSTGRES_DB}"]
n8n:
image: n8nio/n8n:1
restart: unless-stopped
ports:
- "127.0.0.1:5678:5678"
environment:
- N8N_HOST=${N8N_HOST}
- N8N_ENCRYPTION_KEY=${N8N_ENCRYPTION_KEY}
- DB_TYPE=postgresdb
- DB_POSTGRESDB_HOST=postgres
- DB_POSTGRESDB_DATABASE=${POSTGRES_DB}
- DB_POSTGRESDB_USER=${POSTGRES_USER}
- DB_POSTGRESDB_PASSWORD=${POSTGRES_PASSWORD}
volumes:
- n8n_data:/home/node/.n8n
- ./local-files:/files
depends_on:
postgres:
condition: service_healthy
volumes:
postgres_data:
n8n_data:Key choices:
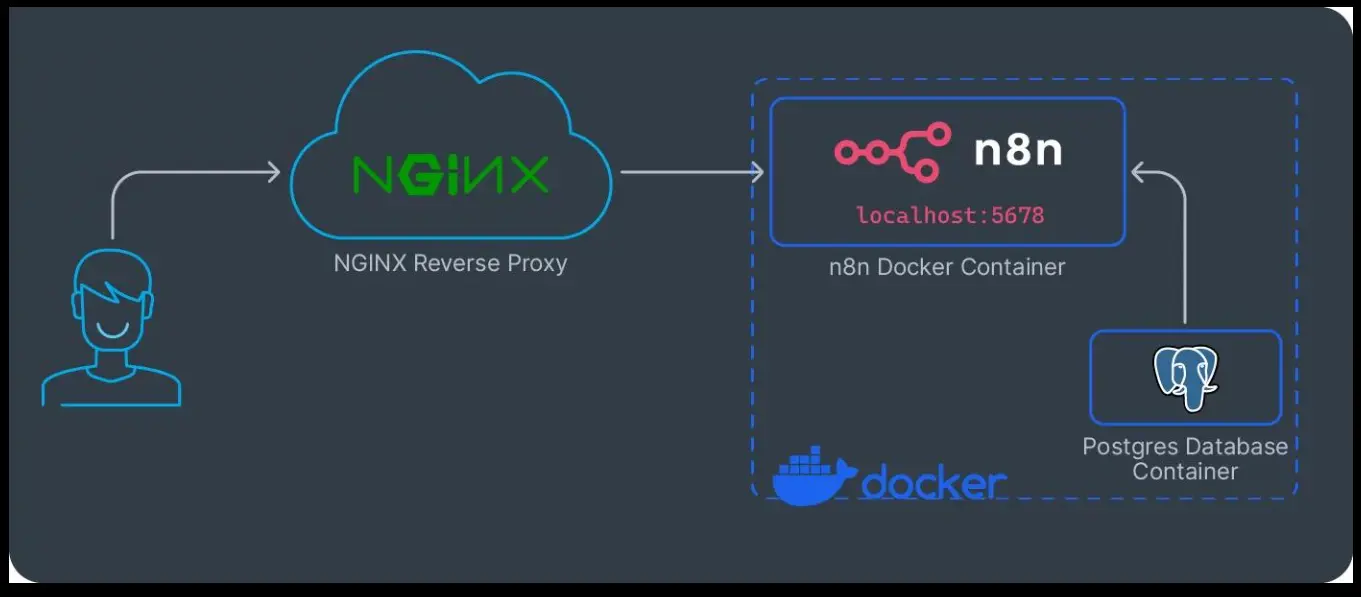
- 127.0.0.1:5678:5678 keeps n8n private; Nginx handles public access.
- n8n_data stores encryption keys and settings. Deleting it can make credentials unreadable.
- n8nio/n8n:1 avoids unexpected major version upgrades.
- service_healthy starts n8n only after Postgres is ready.
Step 8: Start n8n
docker compose up -d
docker compose ps
docker compose logs -f n8n
Both containers should show as healthy/running. The n8n logs should show it initializing the database and listening for connections. Ctrl+C stops following the logs without stopping the container.
Before touching the public domain, confirm it’s reachable locally:
curl -I http://127.0.0.1:5678An HTTP/1.1 200 OK (or a redirect) means n8n is up and the rest is networking and TLS.
Step 9: Configure the firewall
sudo ufw allow OpenSSH
sudo ufw allow 80/tcp
sudo ufw allow 443/tcp
sudo ufw enable
Port 5678 stays closed to the outside world; it’s already bound to localhost in Step 7, and the firewall is a second layer against misconfiguration. All public traffic reaches n8n through Nginx on 443.
Step 10: Install and configure Nginx reverse proxy
Install Nginx:
sudo apt install nginx -yCreate the n8n server block:
sudo nano /etc/nginx/sites-available/n8nserver {
listen 80;
server_name n8n.yourdomain.com;
location / {
proxy_pass http://127.0.0.1:5678;
proxy_http_version 1.1;
proxy_set_header Upgrade $http_upgrade;
proxy_set_header Connection "upgrade";
proxy_set_header Host $host;
proxy_set_header X-Real-IP $remote_addr;
proxy_set_header X-Forwarded-For $proxy_add_x_forwarded_for;
proxy_set_header X-Forwarded-Proto $scheme;
proxy_read_timeout 300s;
proxy_send_timeout 300s;
}
}The WebSocket headers and longer timeouts prevent interruptions during live updates and long-running workflows.
Enable the site and reload Nginx:
sudo ln -s /etc/nginx/sites-available/n8n /etc/nginx/sites-enabled/
sudo nginx -t
sudo systemctl reload nginx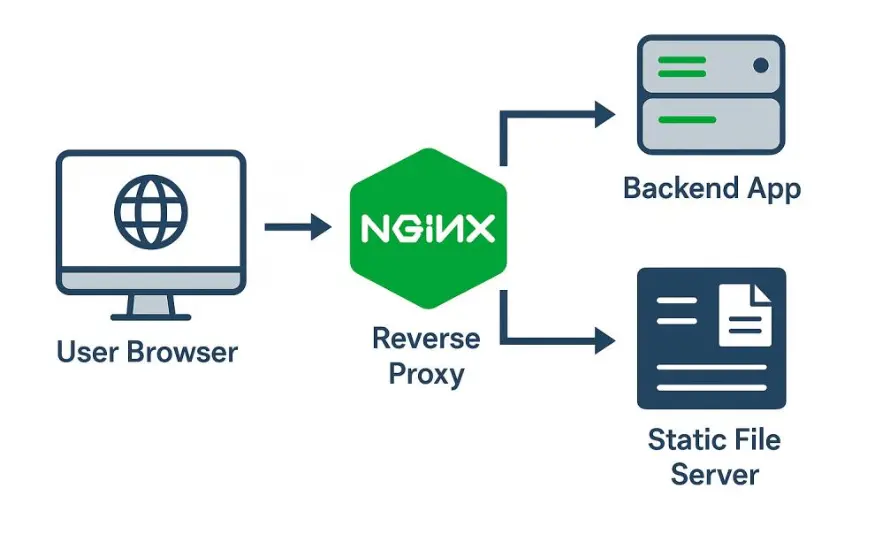
Step 11: Add SSL with Certbot
sudo apt install certbot python3-certbot-nginx -y
sudo certbot --nginx -d n8n.yourdomain.com
Certbot prompts for an email (used for renewal and expiry notices) and asks you to accept the Let’s Encrypt terms. It then edits the Nginx server block directly, adding the listen 443 ssl directive, pointing at the issued certificate, and configuring an automatic HTTP-to-HTTPS redirect.
Confirm the renewal timer works before you need it:
sudo certbot renew --dry-runLet’s Encrypt certificates expire every 90 days; the Certbot package installs a systemd timer (or cron job, on older setups) that renews automatically well before that, so this step is a one-time check rather than an ongoing chore.
Step 12: First login
Visit https://n8n.yourdomain.com. On first load, n8n prompts for an owner account: email, name, and password. This account has full administrative access to the instance; use a strong, unique password, ideally stored in the same password manager as the encryption key.
Once logged in, you’ll land on the workflow canvas, with the credentials store and executions list in the left sidebar. The instance is live and ready for workflows.
Step 13: Set up backups
Back up two things: the Postgres database (workflows, credentials, executions) and the n8n_data volume (encryption key and settings). Losing either means rebuilding the instance.
Create ~/n8n-compose/backup.sh:
#!/bin/bash
set -e

BACKUP_DIR=~/n8n-backups
TIMESTAMP=$(date +%F_%H-%M-%S)

mkdir -p "$BACKUP_DIR"
cd ~/n8n-compose

# Backup database
docker compose exec -T postgres pg_dump -U n8n n8n > "$BACKUP_DIR/n8n_db_$TIMESTAMP.sql"

# Backup workflows and credentials
docker compose exec -T n8n n8n export:workflow --backup --output=/home/node/.n8n/workflows_$TIMESTAMP
docker compose exec -T n8n n8n export:credentials --backup --output=/home/node/.n8n/credentials_$TIMESTAMP

# Remove backups older than 14 days
find "$BACKUP_DIR" -type f -mtime +14 -delete
Make it executable and schedule it daily:
chmod +x ~/n8n-compose/backup.sh
crontab -e
Add:
0 2 * * * /home/deploy/n8n-compose/backup.shStore backups outside the server as well. A backup on the same disk will not help if that disk fails.
Step 14: Updating n8n
cd ~/n8n-compose
docker compose pull
docker compose down
docker compose up -d
Because the image is pinned to n8nio//n8n2.0, pull fetches the latest release within that major version rather than jumping to a potentially breaking one.
Troubleshooting
| Problem | Likely Cause | Solution |
|---|---|---|
| Webhooks aren’t firing | WEBHOOK_URL doesn’t exactly match your public HTTPS domain, or containers weren’t restarted after changing .env. | Verify WEBHOOK_URL (including the trailing slash), save the changes, and restart the containers. |
| “Could not decrypt” credential errors | The encryption key changed or n8n started without N8N_ENCRYPTION_KEY. | Restore the original encryption key in .env and restart. If the original key is lost, all credentials must be recreated. |
| Container keeps restarting | The VPS is running out of memory, especially on a 1GB instance. | Check resource usage with docker stats, then upgrade the VPS RAM or reduce concurrent workflow executions. |
| Database connection errors | DB_POSTGRESDB_HOST or POSTGRES_PASSWORD doesn’t match the PostgreSQL configuration. | Ensure DB_POSTGRESDB_HOST=postgres matches the Compose service name and that the password matches the one used when PostgreSQL was first initialized. |
| SSL certificate fails to issue | DNS hasn’t propagated or port 80 isn’t publicly accessible. | Confirm DNS with dig n8n.yourdomain.com, ensure port 80 is open, then rerun Certbot. |
Your n8n Instance Is Ready
Your self-hosted n8n setup is now running with HTTPS, PostgreSQL storage, controlled updates, and scheduled backups. The infrastructure is in place, so you can focus on creating workflows and automations instead of managing the underlying stack.
Need a reliable hosting environment for your n8n deployment? Check managed n8n hosting options with Truehost n8n Hosting.
How to Run n8n on a VPS FAQs
How much RAM do I need to run n8n on a VPS?
2GB RAM is a good starting point for running n8n with PostgreSQL. While 1GB can handle light workloads, it often runs out of memory. For production use or larger workflows, 4GB or more is recommended.
Should I use Docker or npm to install n8n?
Docker is the recommended option for most self-hosted setups. It’s easier to update, back up, and manage. An npm installation works too, but you’ll need to manage Node.js, dependencies, and the n8n service yourself.
Is PostgreSQL better than SQLite for self-hosted n8n?
Yes, for production. SQLite is fine for testing or small personal projects, but PostgreSQL handles multiple workflows more reliably and is the database recommended by n8n for production deployments.
Why are my n8n webhooks not working?
The most common cause is an incorrect WEBHOOK_URL. Make sure it exactly matches your public HTTPS domain. Also check that N8N_PROXY_HOPS is set correctly if you’re using Nginx or another reverse proxy.
How do I update n8n without losing my workflows?
Run docker compose pull, then restart your containers. Your workflows and credentials remain safe because they’re stored in the database and persistent volumes, not inside the n8n container. Always create a backup before updating.
Is self-hosting n8n on a VPS worth it?
If you run many workflows or want full control over your data, yes. Self-hosting removes usage limits and recurring execution costs, but you’ll be responsible for updates, backups, and server maintenance.
How do I scale n8n when one VPS is no longer enough?
Start by upgrading your VPS with more CPU and RAM. If that’s no longer enough, use n8n’s queue mode with Redis to spread workflow executions across multiple worker instances.