 Domain NamesFind and register your ideal domain name instantly.
 Web HostingEasy-to-use hosting powered by cPanel — ideal for managing websites in Nigeria.
 Windows HostingRun .NET apps with Windows-optimized hosting
 Affiliate ProgramMake money promoting our services
 Reseller HostingMake money by reselling our hosting products under your own brand
 .COM Domains
 All DomainsExplore all supported tld domains in Nigeria
 WhoisFind out who owns any domain, as well as verify your registration details
 VPS Hosting
 Dedicated ServersReimagine your site speed with your own complete server
 AI Website BuilderDesign your site with drag-and-drop tools
 Online Store BuilderStart your online shop without code
 Support PortalFind answers or get expert help
 Contact UsReach our team via chat or email
 BlogRead our extensive guides on web hosting and more
OpenClaw is a Node.js application built and tested on Linux, but that doesn’t mean if you’re on Windows, you don’t get it. WSL2 gives you a Linux environment inside Windows, and that’s why it’s the recommended path for running OpenClaw on a Windows PC.
You could try running parts of the setup directly through PowerShell, but the experience can quickly become frustrating.
Linux file paths, shell behavior, permissions, package management, and service management work differently from their Windows equivalents. Plus, OpenClaw expects the Linux environment it was designed for.
WSL2 closes that gap. It runs a real Linux kernel alongside Windows and gives OpenClaw access to the Linux tools and service management it expects.
You can still use your Windows browser, VS Code, files, and other applications while OpenClaw runs inside Ubuntu.
Prerequisites:
- Windows 10 Build 19041+ or Windows 11 (check with winver).
- Virtualization enabled in BIOS (Intel VT-x / AMD-V / SVM Mode). The single most common reason WSL2 appears to install but Ubuntu refuses to launch.
- RAM: 4 GB minimum, 8 GB comfortable, 16 GB if running a local model alongside OpenClaw.
- Storage: Reserve at least 4 GB; 10 GB if expanding the setup later.
- An API key from Anthropic, OpenAI, Google, or MiniMax; the onboarding wizard cannot complete without one
- Optional but recommended: Windows Terminal from the Microsoft Store
This guide takes you through the complete setup, from installing WSL2 and Ubuntu to configuring Node.js, onboarding OpenClaw, enabling systemd, and making the gateway run automatically in the background.
Step 1: Install WSL2 and Set Up Ubuntu
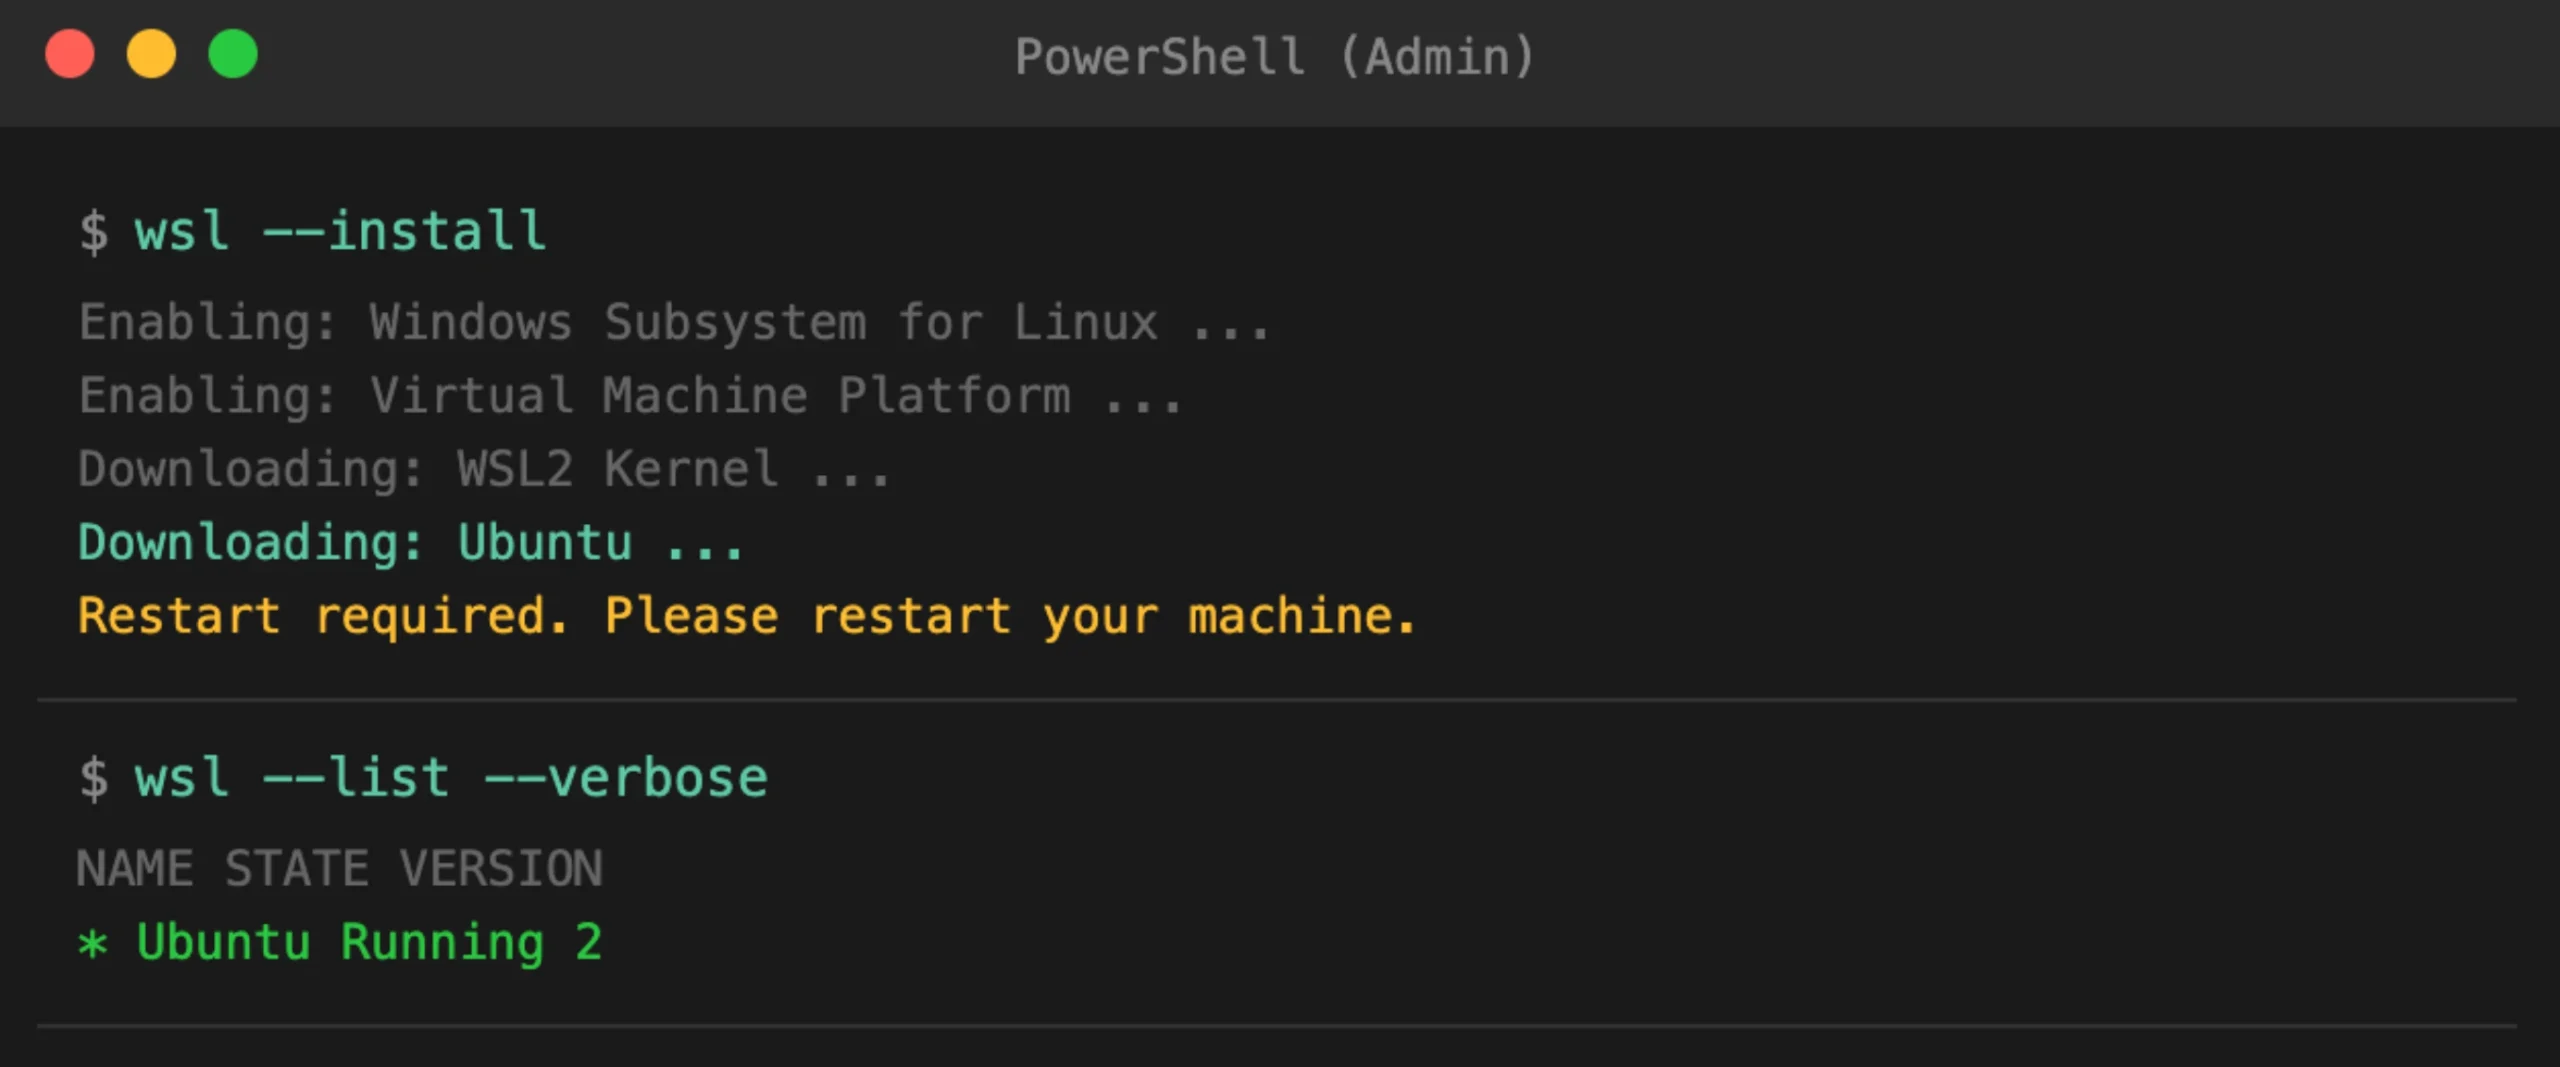
Open PowerShell as Administrator or Windows Terminal as Administrator and run:
wsl --installThis command enables the required Windows features, installs the WSL2 kernel components, and downloads Ubuntu.
When Windows asks you to restart, do it. The WSL2 kernel components will not load correctly until the restart is complete.
After Windows starts again, Ubuntu should open and ask you to create a Linux username and password.
Your Linux username does not have to match your Windows username. Choose something simple that you will recognize.
Keep the password somewhere safe. Ubuntu will ask for it when you use sudo, and recovering a forgotten Linux password can be inconvenient enough that reinstalling the distribution may be the easiest option.
Most importantly, do not run OpenClaw as root. Give the agent a normal Linux user account instead. An AI agent that can execute commands and work with files does not need unrestricted root access.
Once Ubuntu is ready, confirm that it is running under WSL2.
From PowerShell, run:
wsl --list --verboseYou should see something similar to:
NAME      STATE           VERSION
Ubuntu    Running         2
The important part is the VERSION column. It must show 2.
If Ubuntu is still using WSL1, first make WSL2 the default:
wsl --set-default-version 2Then convert Ubuntu:
wsl --set-version Ubuntu 2
The conversion may take a few minutes.
WSL1 is not the right environment for this setup. Unlike WSL2, it does not run a real Linux kernel. Instead, it translates Linux system calls, and that difference can cause compatibility problems with OpenClaw dependencies and Linux service management.
Step 2: Enable Systemd in WSL
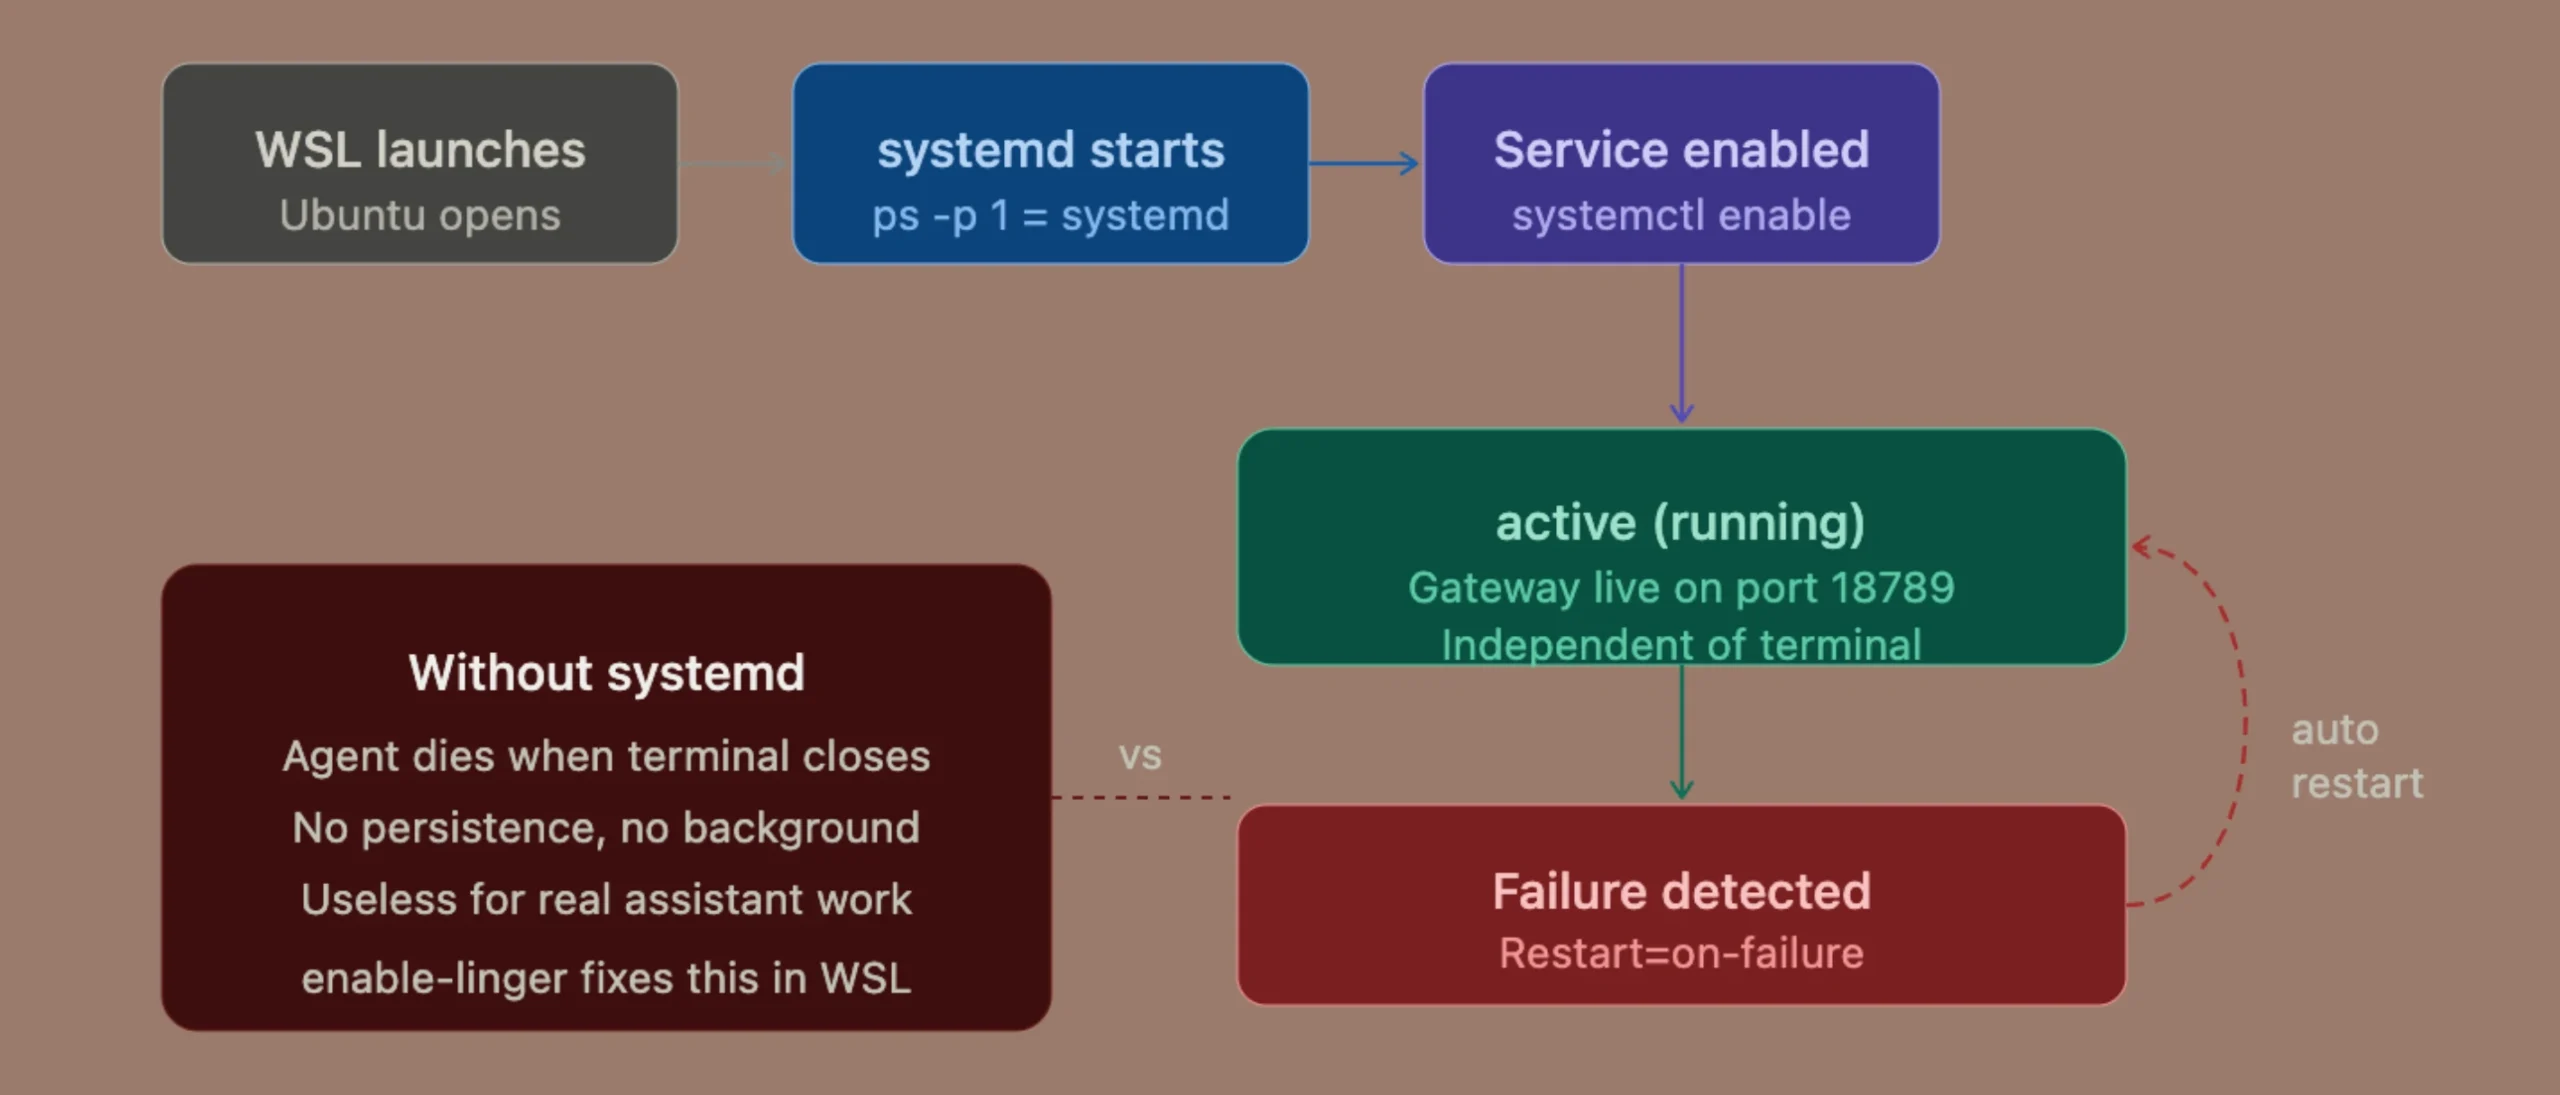
Systemd is the service manager that lets Linux applications run as persistent background services. For OpenClaw, it gives you a proper way to keep the gateway running after you close the Ubuntu terminal.
WSL2 supports systemd, but you need to enable it.
Open Ubuntu and run:
sudo tee /etc/wsl.conf > /dev/null << 'EOF'
[boot]
systemd=true
EOF
Now close Ubuntu and return to PowerShell. Shut down WSL completely:
wsl --shutdownOpen Ubuntu again and check which process is running as process 1:
ps -p 1 -o comm=The output should be:
systemdIf you see init instead, check /etc/wsl.conf, make sure the configuration was saved correctly, run wsl --shutdown again, and reopen Ubuntu.
This step is important because the later service configuration depends on systemd.
Step 3: Install Node.js 22 or Higher
OpenClaw requires a recent Node.js release. Ubuntu’s standard repositories can provide older Node.js versions, so installing nodejs directly with apt may leave you with a version that OpenClaw cannot use.
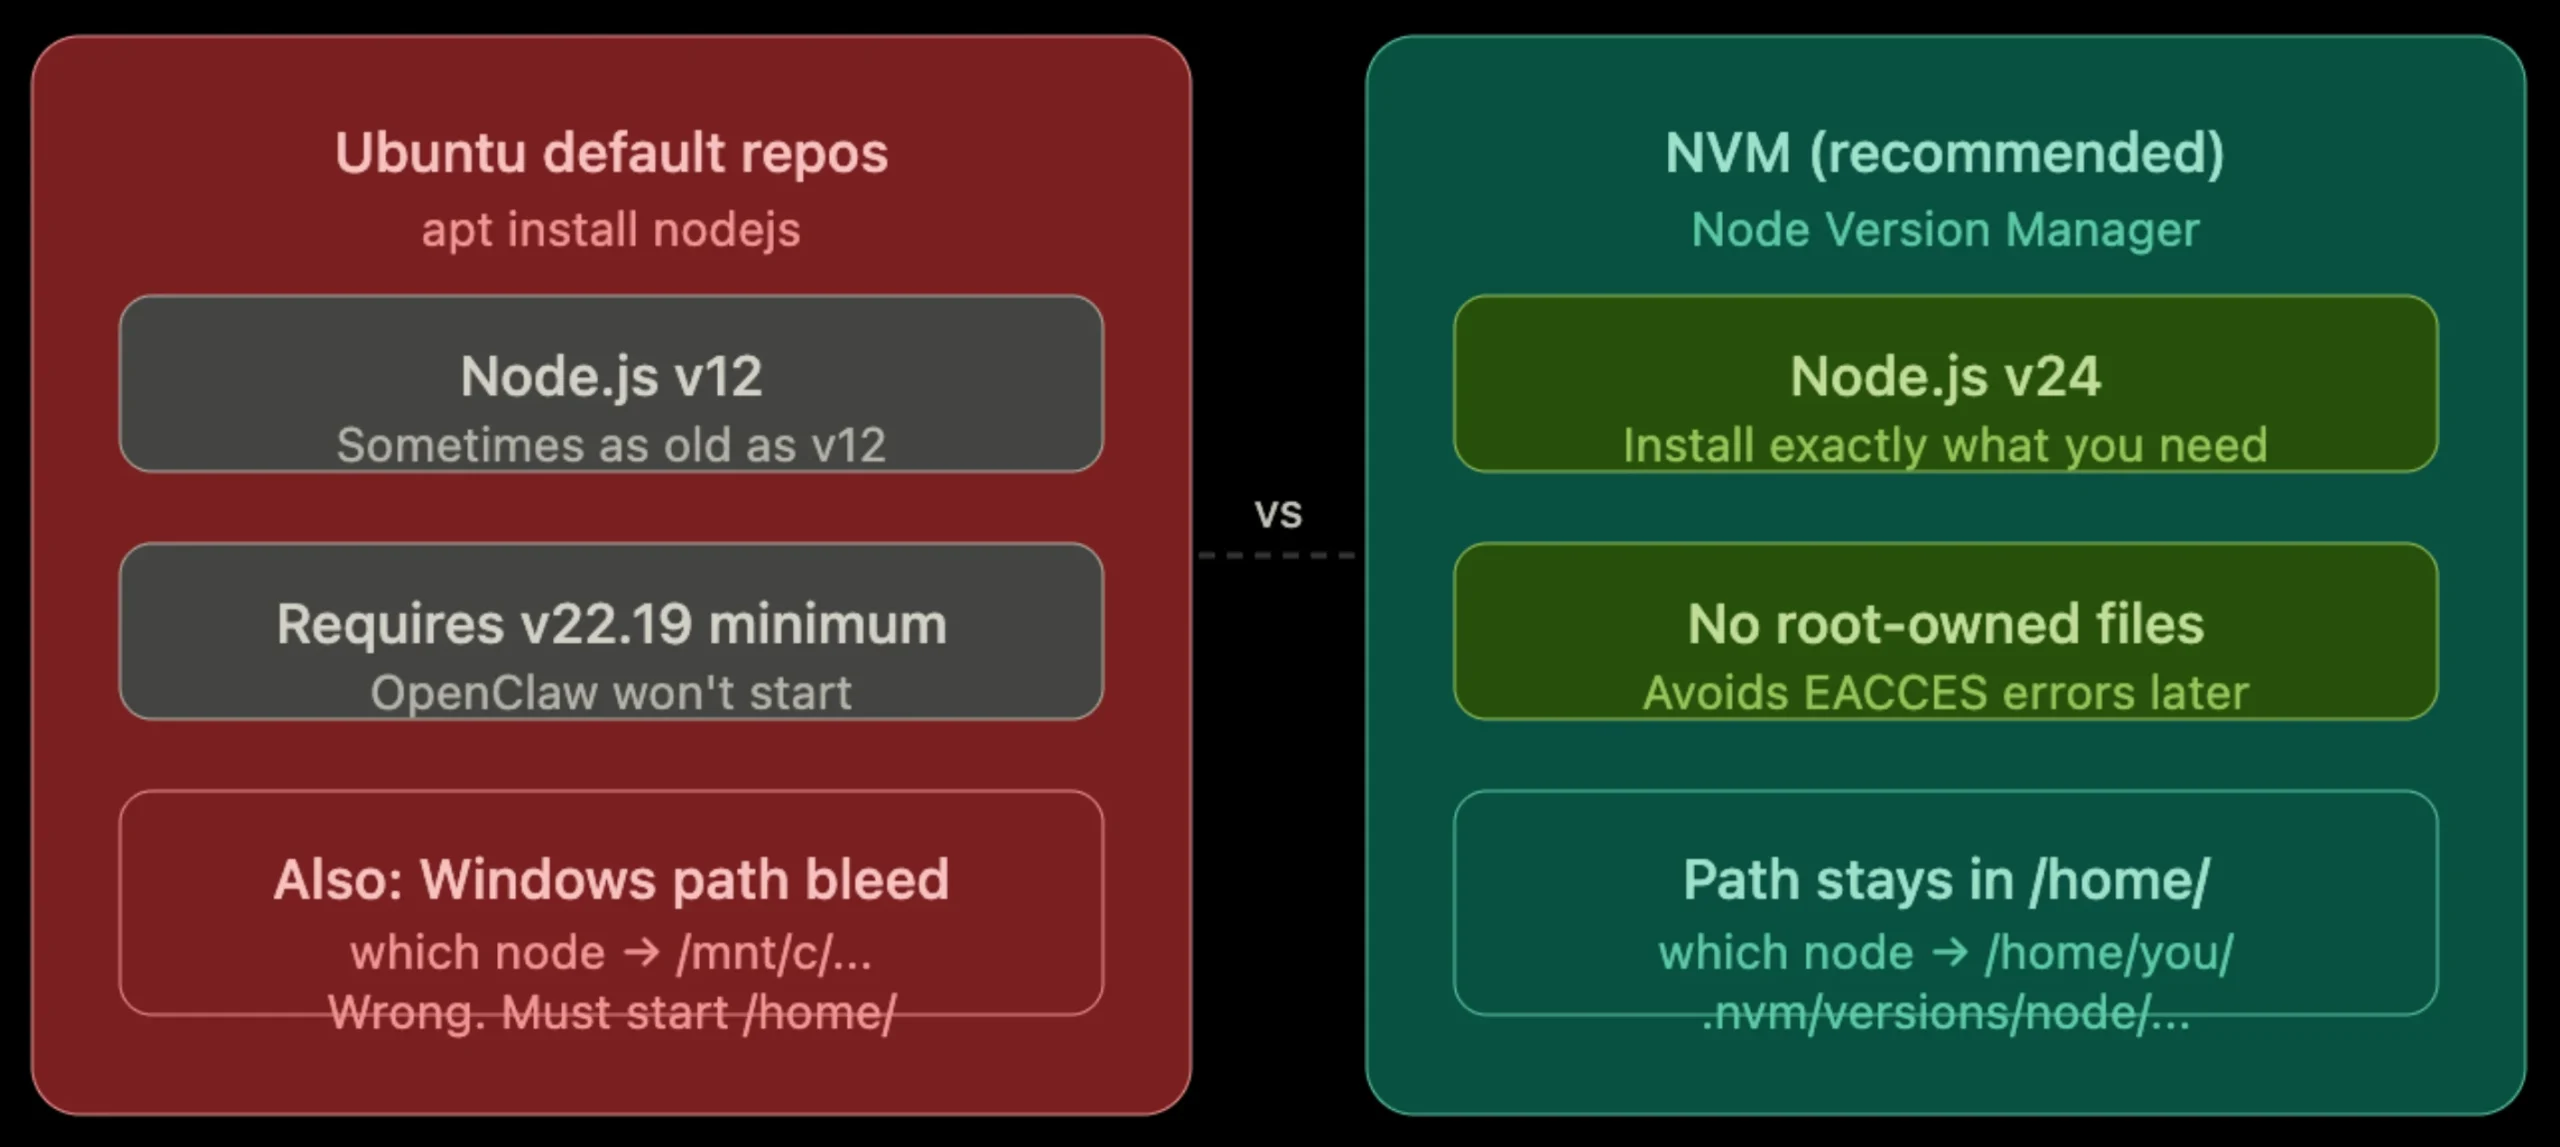
OpenClaw requires at least Node.js v22.19, while Node.js v24 is recommended.
For this setup, NVM (Node Version Manager) is a convenient option. It lets you install the required Node.js version without putting the installation under root ownership, and you can switch versions later if needed.
Install NVM with:
curl -o- https://raw.githubusercontent.com/nvm-sh/nvm/v0.40.1/install.sh | bashClose and reopen Ubuntu so NVM is loaded, then install Node.js 24:
nvm install 24Set it as the default:
nvm alias default 24Check the installed version:
node -vYou should see a version beginning with:
v24There is one Windows-specific issue worth checking here.
If you already installed Node.js on Windows, Windows’ Node.js path can sometimes appear inside WSL. That can lead to confusing behavior because OpenClaw may end up using the Windows executable instead of the Linux installation.
Run:
which nodeThe result should point to your Linux home directory, typically something similar to:
/home/yourusername/.nvm/versions/node/...It should not point to /mnt/c/.
Step 4: Install and Onboard OpenClaw
With Node.js ready, install OpenClaw globally:
npm install -g openclaw@latestThen start the onboarding process:
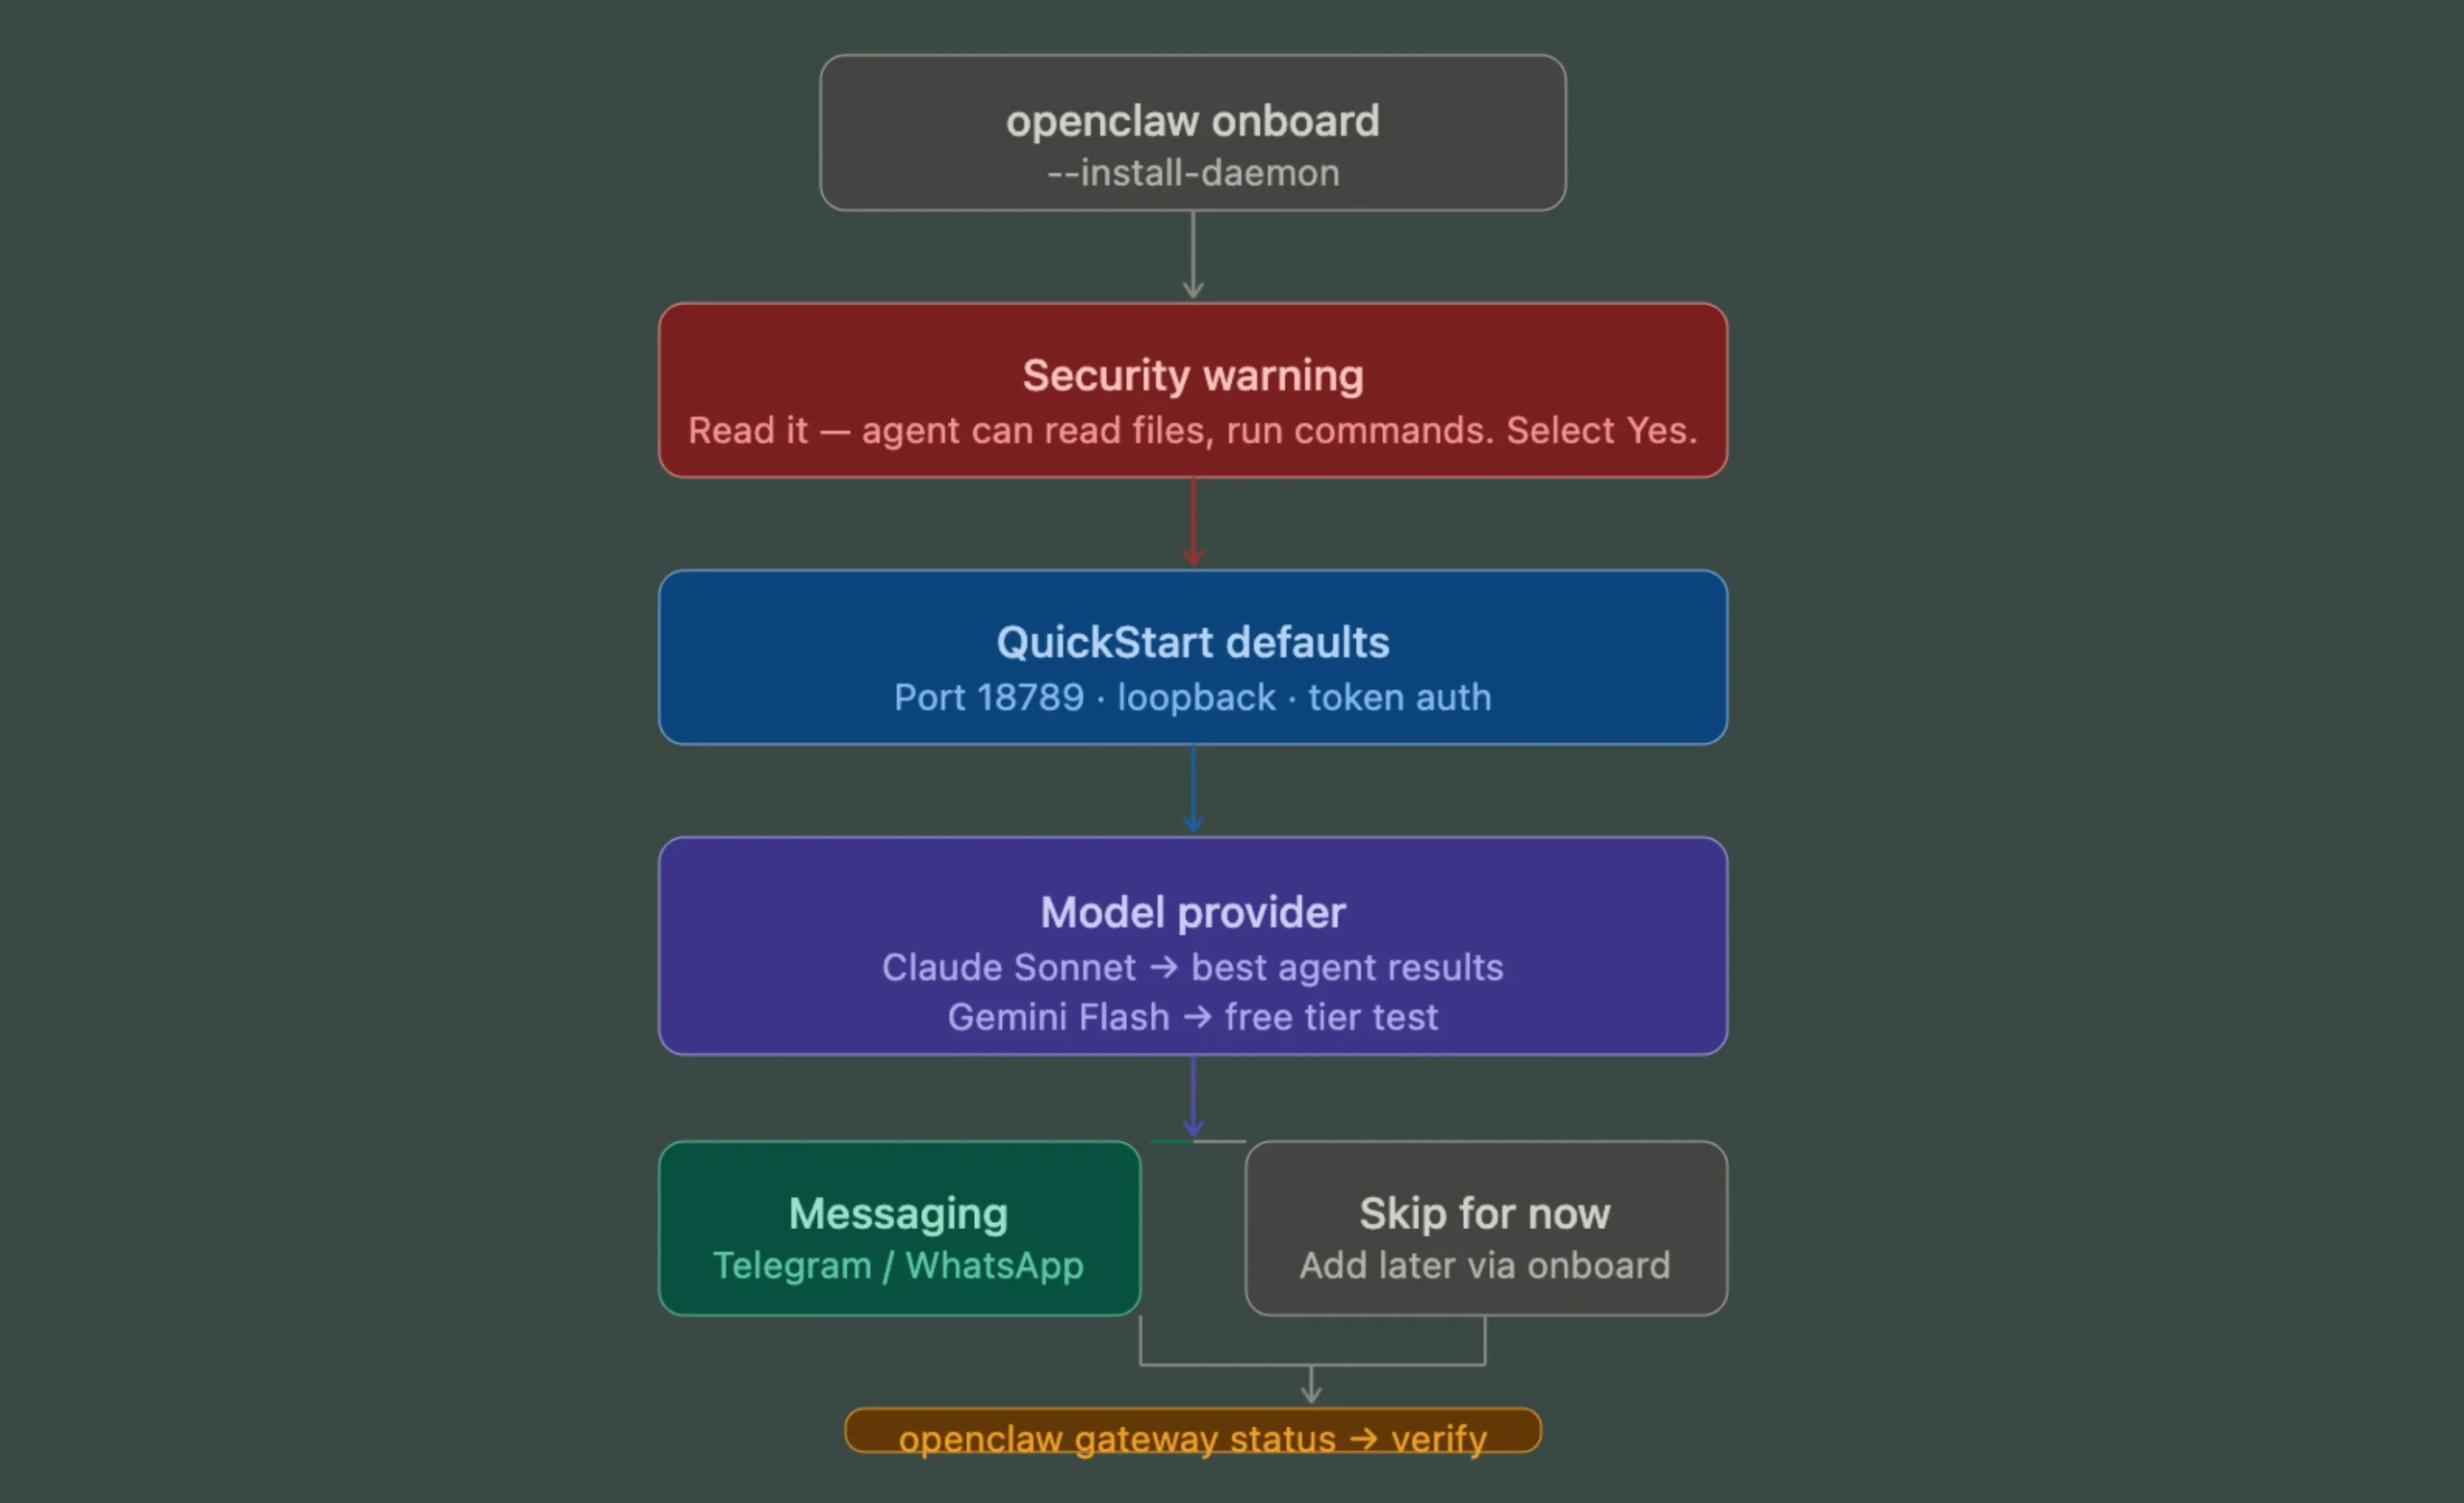
openclaw onboard --install-daemonThe onboarding wizard takes you through the initial configuration.
1) Read the security warning
Do not skip this screen.
It tells you specifically what the agent can do: read files, run commands, browse the web, and access external tools if enabled. Select Yes to continue once you have read it.
2) QuickStart defaults
Accept these for a first setup. The gateway binds to port 18789, uses loopback binding (127.0.0.1), and enables token-based authentication.
If you later configure Windows Firewall rules that expose port 18789 beyond the loopback, for example, to reach the gateway from your phone on the same network, take a moment to review your authentication setup.
The token auth that ships by default is a starting point, not a full security posture.
At minimum:
- Rotate the token regularly
- Never expose port
18789to the public internet - Restrict inbound firewall rules to specific local IP ranges where possible
- Keep your API keys out of shared config files
3) Choose an AI provider
The onboarding wizard will ask you to select a model provider and enter your API key.
Claude Sonnet is a strong all-round starting point for agent tasks. Gemini Flash is another practical option if you want to begin with a lower-cost or available free-tier option.
You do not need the most expensive model to get useful results from OpenClaw. A mid-tier model is enough for a large share of everyday tasks, and you can move to a more capable model when a particular workflow really needs it.
4) Connect your messaging channels
You can connect Telegram, WhatsApp, Discord, or other supported channels during onboarding.
There is no need to configure everything immediately. You can finish the core installation first and add channels later by running:
openclaw onboard5) Verify the gateway
Once onboarding is complete, check the gateway:
openclaw gateway statusYou should see that it is running.
To open the dashboard, use:
openclaw dashboardThis is preferable to manually typing localhost:18789 into the browser because the command provides the appropriate tokenized dashboard URL.
For a local setup, the gateway listens on port 18789, and WSL2 normally makes localhost services available to Windows automatically.
6) If you need access from another device
This requires a different approach from simply using the dashboard locally.
If you deliberately expose the gateway beyond localhost, keep authentication enabled and restrict access to trusted devices or networks. A Windows Firewall rule by itself does not make an exposed gateway secure.
For a home or office network, use a narrowly scoped inbound firewall rule rather than opening the port broadly to every network. Avoid router port forwarding unless you have a specific reason and a proper security layer in front of the gateway.
For internet-facing access, a reverse proxy with HTTPS and appropriate access controls is a safer architecture than exposing the OpenClaw gateway directly on port 18789.
Step 5: Make OpenClaw Run Automatically on WSL
At this stage, OpenClaw can work, but you do not want the gateway to depend on an open Ubuntu terminal.
Create a systemd service so Linux can manage OpenClaw as a background process.
Open the service file:
sudo nano /etc/systemd/system/openclaw.serviceAdd:
[Unit]
Description=OpenClaw Gateway
After=network.target

[Service]
Type=simple
User=YOUR_USERNAME
ExecStart=/home/YOUR_USERNAME/.nvm/versions/node/VERSION/bin/openclaw gateway
Restart=on-failure

[Install]
WantedBy=multi-user.target
Replace YOUR_USERNAME with your actual Linux username.
Do not copy the Node.js path from this example blindly. Find the actual OpenClaw executable first:
which openclawUse the resulting path for ExecStart.
For example, if which openclaw returns:
/home/name/.nvm/versions/node/v24.15.0/bin/openclawthen use that exact path in the service file.
Save the file, then enable and start the service:
sudo systemctl enable openclaw
sudo systemctl start openclaw
Now enable systemd lingering for your Linux user:
sudo loginctl enable-linger "$(whoami)"This allows the user-level environment to remain active so the service can start when the WSL environment comes up without requiring you to keep an Ubuntu terminal open.
Finally, check the service:
sudo systemctl status openclawLook for:
active (running)If it is active, OpenClaw is now running as a background service instead of depending on an open terminal window.
Performance Tips: Getting the Most Out of OpenClaw on WSL
A default WSL2 setup works, but a few adjustments make a real difference.
a) Cap WSL2’s RAM Usage
WSL2’s memory behavior depends on your Windows version. On Windows 11 22H2 and later, WSL2 defaults to 50% of total system memory (or 8 GB, whichever is lower), a reasonable cap for most systems.
On older builds, the default is higher.
Either way, if you have manually set memoryLimit in your .wslconfig above 50%, WSL2 can quietly consume up to 80% of your system RAM under load.
To set an explicit limit, create or edit C:\Users\YourName\.wslconfig in Windows and add:
[wsl2]
memory=4GB
processors=2
swap=2GB
Half of your total RAM is a good rule of thumb for the memory value. Run wsl --shutdown in PowerShell to apply, then reopen Ubuntu.
b) Keep all OpenClaw files in the Linux filesystem
Every file operation that crosses into /mnt/c/ goes through a translation layer between the Linux and Windows filesystems, noticeably slower than working within Ubuntu directly.
Keep your OpenClaw config and data under ~/ inside Ubuntu.
This also happens to be the top cause of config reset on restart: if your openclaw.json is sitting on the Windows drive, it can be overwritten or reset when WSL reinitializes. Move it if needed:
cp /mnt/c/openclaw/openclaw.json ~/.openclaw/openclaw.jsonc) Switch your Ubuntu apt mirror
Ubuntu’s default package mirror is US-based. Switching to a regional mirror in /etc/apt/sources.list cuts download times noticeably on slower connections.
Use ng.archive.ubuntu.com as your mirror address for Nigerian network conditions.
d) Use VS Code with the WSL extension
Install the Remote – WSL extension in VS Code, and always launch it with code . from inside your Ubuntu terminal rather than from Windows.
The bottom-left corner of VS Code will show WSL: Ubuntu when connected correctly. Editing files from the Windows side introduces the same filesystem translation overhead described above.
Troubleshooting: The Most Common OpenClaw on WSL Errors
When something goes wrong, start with:
openclaw doctorIt checks major parts of the installation and can quickly point you toward the problem.
1. openclaw: command not found: npm installed OpenClaw, but your shell cannot find the binary. Run npm config get prefix to find the global bin path, then add it to ~/.bashrc:
export PATH="$PATH:$(npm config get prefix)/bin"
source ~/.bashrc
2. EACCES: permission denied: A previous install ran with sudo, leaving root-owned files in npm’s global directory. Never use sudo npm install -g. Uninstall OpenClaw, fix the file ownership, and reinstall without sudo.
3. ECONNREFUSED: The gateway is not running. Start it with openclaw gateway start. If it immediately stops, check the logs:
journalctl -u openclaw -n 50Also check that Windows Firewall has an allow rule for port 18789 if you are trying to reach the gateway from another device.
4. npm install appears frozen: OpenClaw pulls several hundred megabytes of dependencies on first install. Wait at least ten minutes before assuming it is stuck. If you want to see live progress, cancel and rerun with --verbose.
5. Dashboard shows “Unauthorized”: you are navigating to localhost:18789 directly. Use openclaw dashboard instead to get the tokenized URL with credentials embedded.
6. Other devices on the same network cannot reach the gateway: Windows Firewall is blocking port 18789. In PowerShell as Administrator, add an inbound allow rule:
netsh advfirewall firewall add rule name="OpenClaw Gateway" dir=in action=allow protocol=TCP localport=18789OpenClaw on WSL FAQs
Does OpenClaw work on WSL1 or only WSL2?
Use WSL2. It runs a real Linux kernel, while WSL1 uses a compatibility layer for Linux system calls. OpenClaw’s Linux dependencies and systemd-based service setup are designed around a real Linux environment, so WSL2 is the appropriate choice.
Which Node.js version does OpenClaw require on WSL?
OpenClaw requires at least Node.js v22.19, with v24 recommended for this setup. Using NVM makes it easier to install and maintain the correct version without relying on Ubuntu’s potentially outdated default package repository.
Which AI provider should I start with for OpenClaw?
Claude Sonnet is a strong general-purpose choice for agent workflows. Gemini Flash can be a useful starting point if you want to test OpenClaw with a lower-cost or available free-tier option.
Start with a model that comfortably handles your tasks rather than automatically choosing the most expensive option. You can change providers or models later.
How do I access the OpenClaw dashboard from my phone on the same network?
Local access from another device requires the gateway to listen beyond the loopback interface and a Windows Firewall rule that permits the connection.
Once configured, you would access the machine using its local network address rather than localhost, for example:
http://192.168.x.x:18789Keep authentication enabled and restrict access to your trusted network. Do not expose port 18789 to the public internet simply to make phone access work.
Why does OpenClaw stop when I close my terminal, and how do I fix it?
systemd is either not enabled in WSL or the service file has not been created yet. Follow Step 5 to set up the background service. Once that is in place, the gateway runs independently of any terminal window.
Is there an easier way to run OpenClaw without going through WSL setup?
Yes. If your goal is to have OpenClaw available continuously rather than learn how to maintain a Linux environment inside Windows, a VPS removes most of the local setup.
A managed OpenClaw VPS can provide the Linux environment, Node.js installation, storage, networking, and service configuration without requiring you to configure WSL yourself.
When to Stop Running OpenClaw Locally
OpenClaw on WSL is a genuinely good setup for developers testing, hobbyists, and anyone who wants full control and is comfortable working in a terminal. But it has real limits that are worth being honest about.
Your agent goes offline whenever your PC is off, loses power, or reboots. Nigerian power situations make this a genuine operational risk, not a theoretical one.
WSL2’s virtual network adapter can also be disrupted by VPN changes, antivirus software, and certain network configurations. And RAM limits on a shared Windows machine constrain what the agent can handle under load once you add other applications into the mix.
For anyone who needs OpenClaw running continuously without depending on a local machine, Truehost OpenClaw VPS Hosting is the faster, more reliable path.
We deploy your OpenClaw environment in seconds. Ubuntu comes pre-installed, Node.js is already configured, and the gateway is running before you even log in, so, no wsl.conf, no systemd service files, and no firewall rules to write.
You get dedicated CPU and RAM, NVMe SSD storage, and full root SSH access.
Plans are billed in Nigerian Naira with no hidden conversion fees:
- OpenClaw Starter: ₦14,000.00/month billed triennially: 1 vCPU, 2 GB RAM, 50 GB NVMe, 4 TB bandwidth
- Pro: ₦28,000.00/month billed triennially: 2 vCPU, 4 GB RAM, 100 GB NVMe
- Business: ₦63,000.00/month billed triennially: 4 vCPU, 8 GB RAM, 200 GB NVMe, built for teams running heavier automation pipelines